Jun 27, 2021 | Snacks

Parmesan Crisps.
I love cheese! What’s the surprise in this statement though. Who doesn’t?
These are Parmesan cheese crisps made in a pan on stove top. Use it as a garnish on pastas, serve it with salads or soups or as a part of your charcuterie board. Alternatively this could be made in an oven too. The crunch and colour is so gorgeous.
I have made a small attempt to create a stove top process video. Linked here.
To make this with just one ingredient, I have listed both the oven and stove top processes below.
Stove top –
Brush or spray a flat non stick pan with minimal oil. Heat the pan on medium low. Then sprinkle grated Parmesan cheese on it. Sprinkle some freshly crushed black pepper or red chilli flakes. Let it melt and start forming into a thin crisp. Do not touch it. Once it has attained the crisp texture, flip it and let it turn golden brown from the other side. Keep the flame on medium low throughout. Then remove it from the pan and break it into pieces. Relish as desired and enjoy!
Oven baked –
To make in the oven, line a baking tray with parchment paper. Preheat the oven at 180 C fan assisted or 200 C conventional. Place the grated Parmesan cheese. Sprinkle some freshly crushed black pepper or red chilli flakes. Bake it for 7-8 mins until it turns crisp golden brown. Enjoy!!!
If you like this black eyed beans curry, please let me know your thoughts in the comments below. You can also connect with me on my Instagram and Facebook handle.
You may also like –
Cheese chilli garlic pull apart bread.
Jun 23, 2021 | Mains
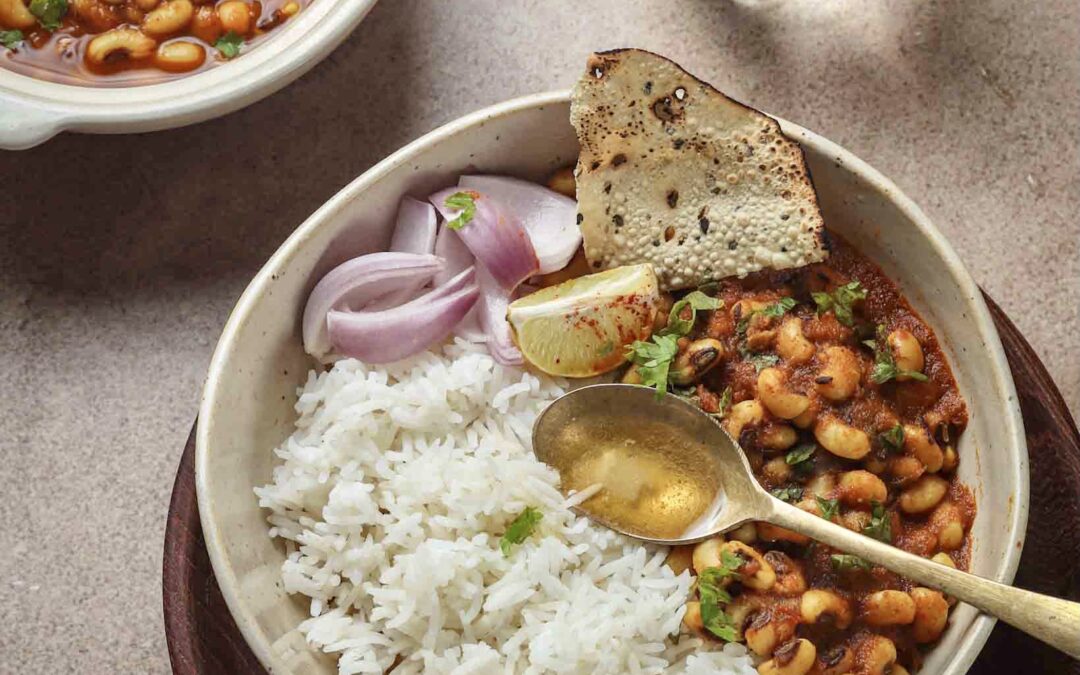
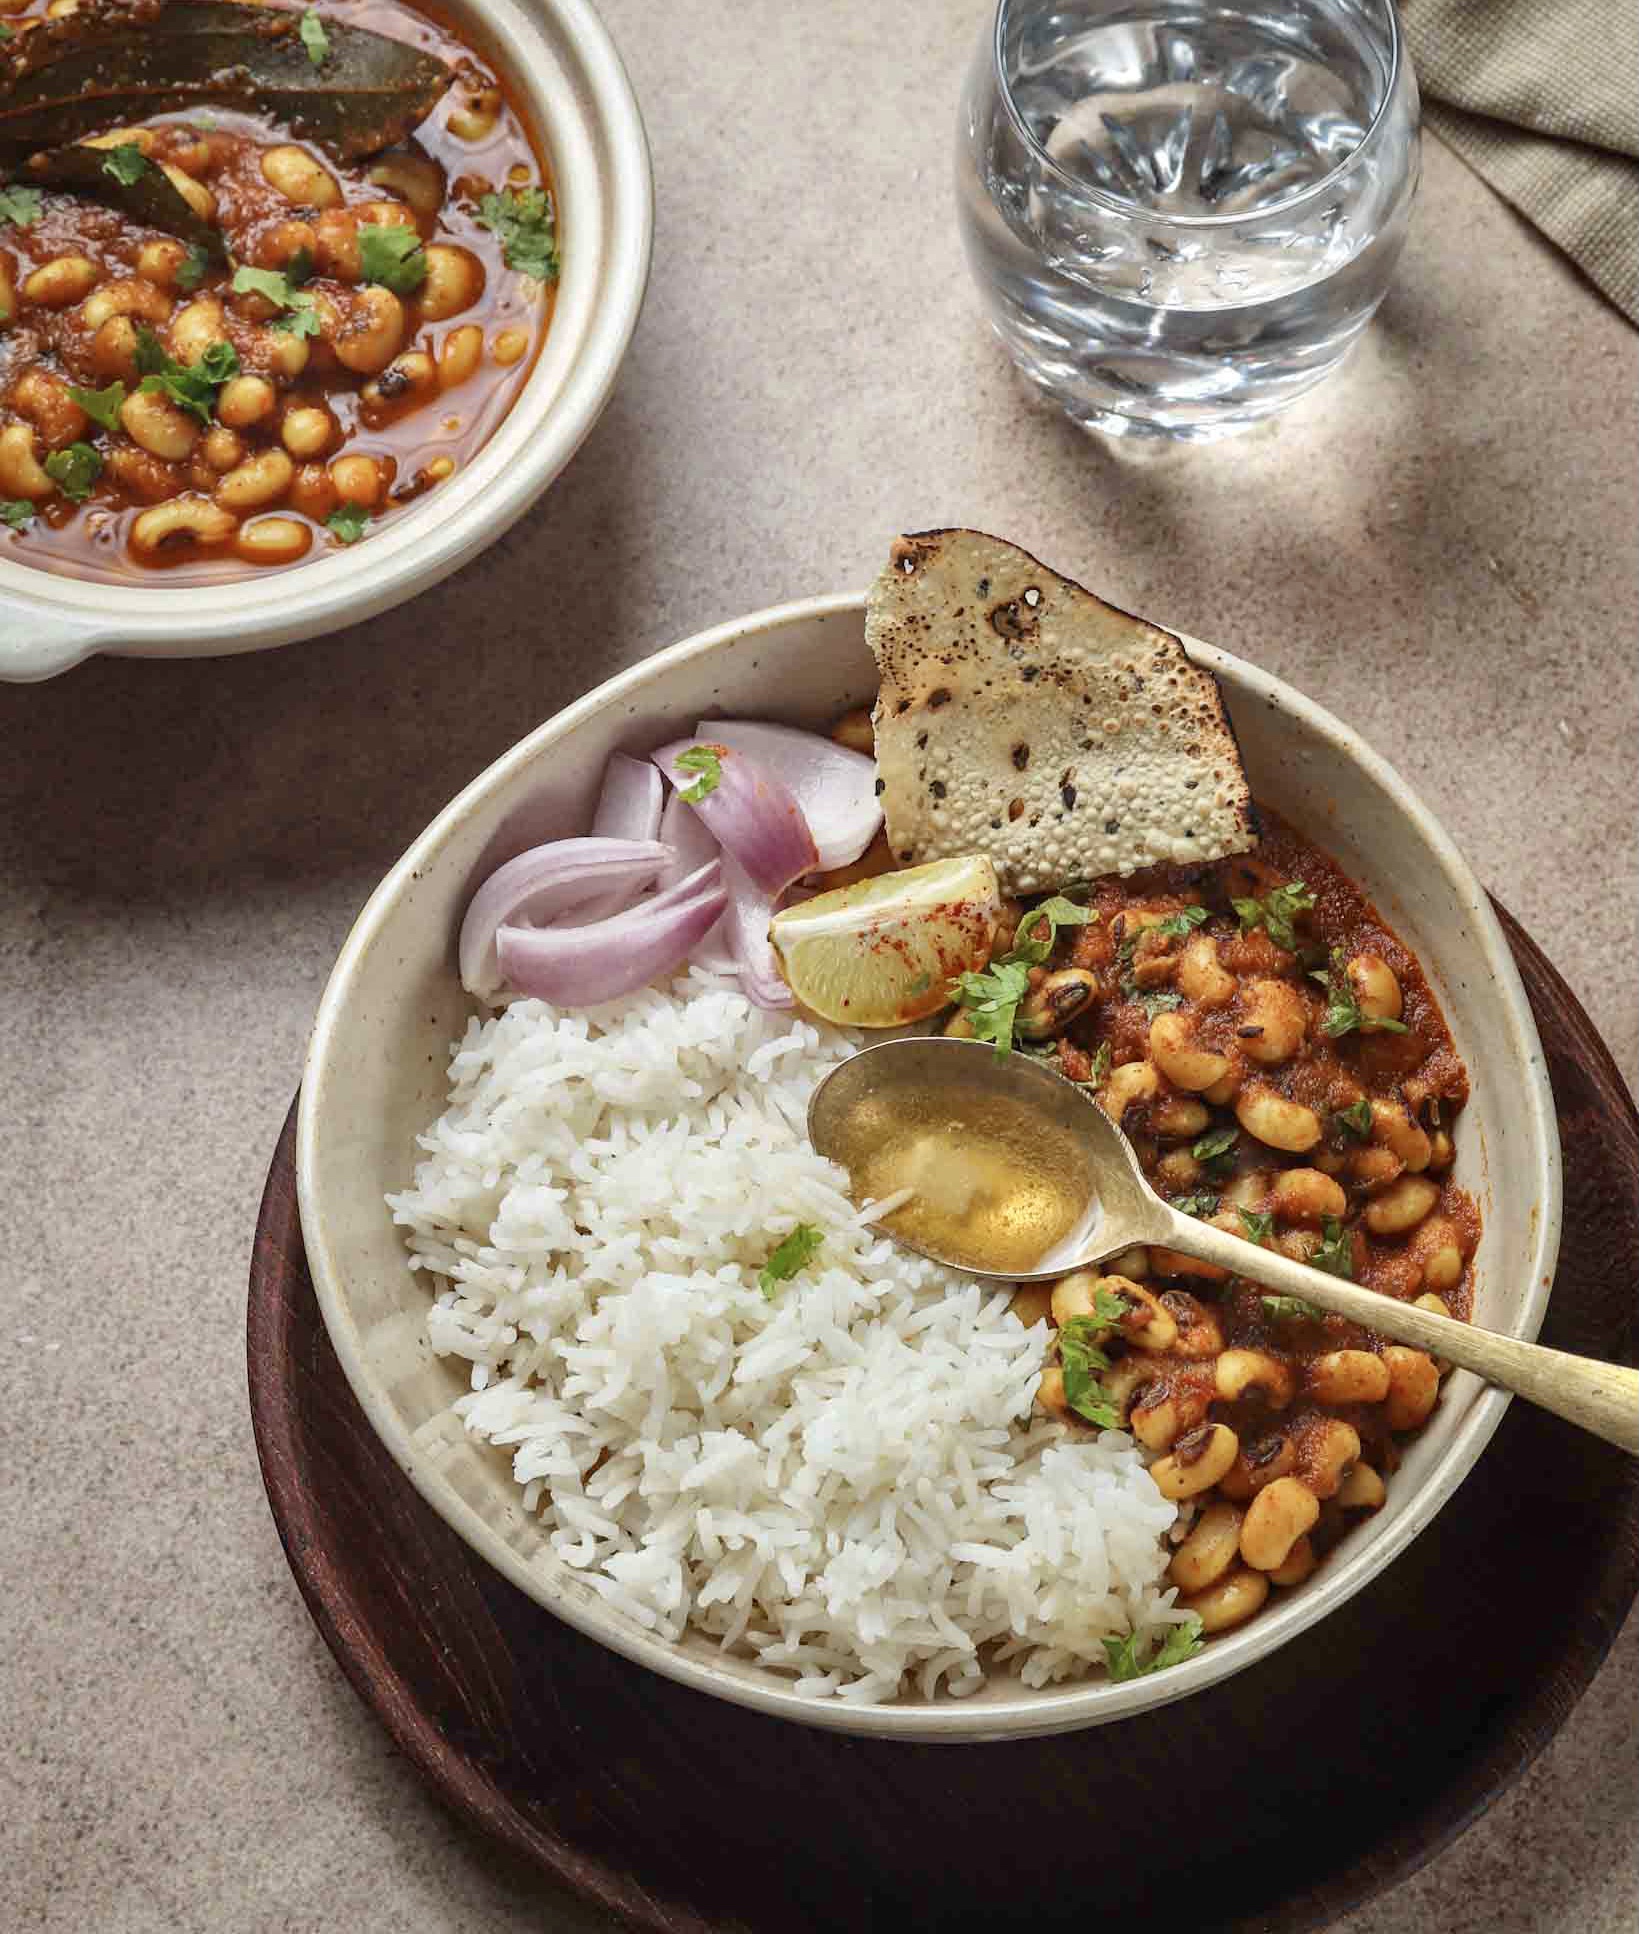
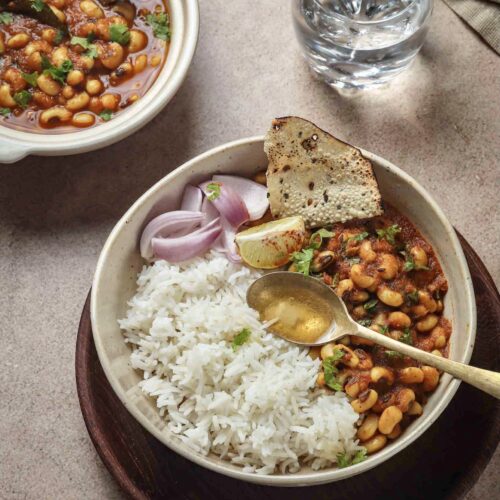
Black Eyed Beans Curry
Black Eyed Beans Curry
This is my and my family’s version of comfort food. Black eyed beans, also known as lobia or chawli is made in an onion and tomato gravy. Lobia is pressure cooked along with the gravy so it absorbs the flavours really well. Club it with hot steamed rice with ghee, or ghee laden phulkas. Tastes best with an onion salad on the side and a lemon wedge. One of the things that truly satisfies my soul.
Did I already mention this takes less than 30 minutes to come together? And while it pressure cooks, put the rice to cook and you have a quick hot and pleasing meal ready. It is such a good option for busy weekday meals. I usually make a big batch of it to last us for two meals. This is one delicious meal and so more-ish.
As I mentioned earlier, I usually make cook the onions and tomatoes with spices in the pressure cooker pot and then add the black eyes beans and pressure cook it in along with the gravy. Or the other option is to pressure cook the black eyes beans separately and add it to the onion and tomatoes gravy.
If you like this black eyed beans curry, please let me know your thoughts in the comments below. You can also connect with me on my Instagram and Facebook handles.
You may also like –
Indian Spicy Potato Curry
Black Eyed Beans Curry
Arpita Darooka
Indian curry pressure cooked in onion and tomato gravy.
Prep Time 5 minutes mins
Cook Time 20 minutes mins
Course Main Course
Cuisine Indian
- 1 Cup Black eyed beans (lobia)
- 2 Pcs Onions Finely chopped
- 1 Cup Tomato purée
- 7-8 Cloves Garlic
- 1 Inch Ginger
- 3-4 Pcs Green chillies
- 1/4 Cup Coriander leaves Chopped
- 1 Tbsp Ghee
- 1 Tsp Oil
- 2 Tbsp Curd Whisked
- 2 Cups Water
- Kasuri methi Optional
Whole spices
- 1.5 Tsp Cumin seeds
- 1 Pc Star anise
- 6-7 Pcs Black peppercorns
- 1 Inch Cinnamon
- 1 Pc Bay leaf
Dry Spices
- 1.5 Tsp Coriander powder
- 1.5 Tsp Red chilli powder
- 1/2 Tsp Turmeric powder
- 1 Tsp Roasted cumin powder
- 1/2 Tsp Garam masala
- Salt to taste
Soak black eyes beans for 1 hour in hot water. Add a little salt in it.
Make a paste of ginger, garlic and green chillies and keep aside.
In the same blender, purée tomatoes if not using readymade one.
In a pressure cooker, heat ghee and oil. Add the whole spices and sauté until they turn fragrant.
Add the ginger garlic chilli paste and sauté for a minute. Add the onions. Let the onions cook until it turns golden brown.
Add in the tomatoes along with salt. Let it cook until it releases oil. Add in the whisked curd and stir until the oil is released again.
Add all the dry spices except garam masala.
Add the soaked beans and mix it all well. Add water.
Pressure cook to upto 2 whistles. Let the steam release on it’s own. Remove lid and add garam masala and coriander leaves.
Add in a pinch of kasuri methi if using.
Garnish with more chopped coriander leaves and enjoy!!
Keyword Black eyes beans curry, curry recipe, Indian recipes
Jun 21, 2021 | Mains
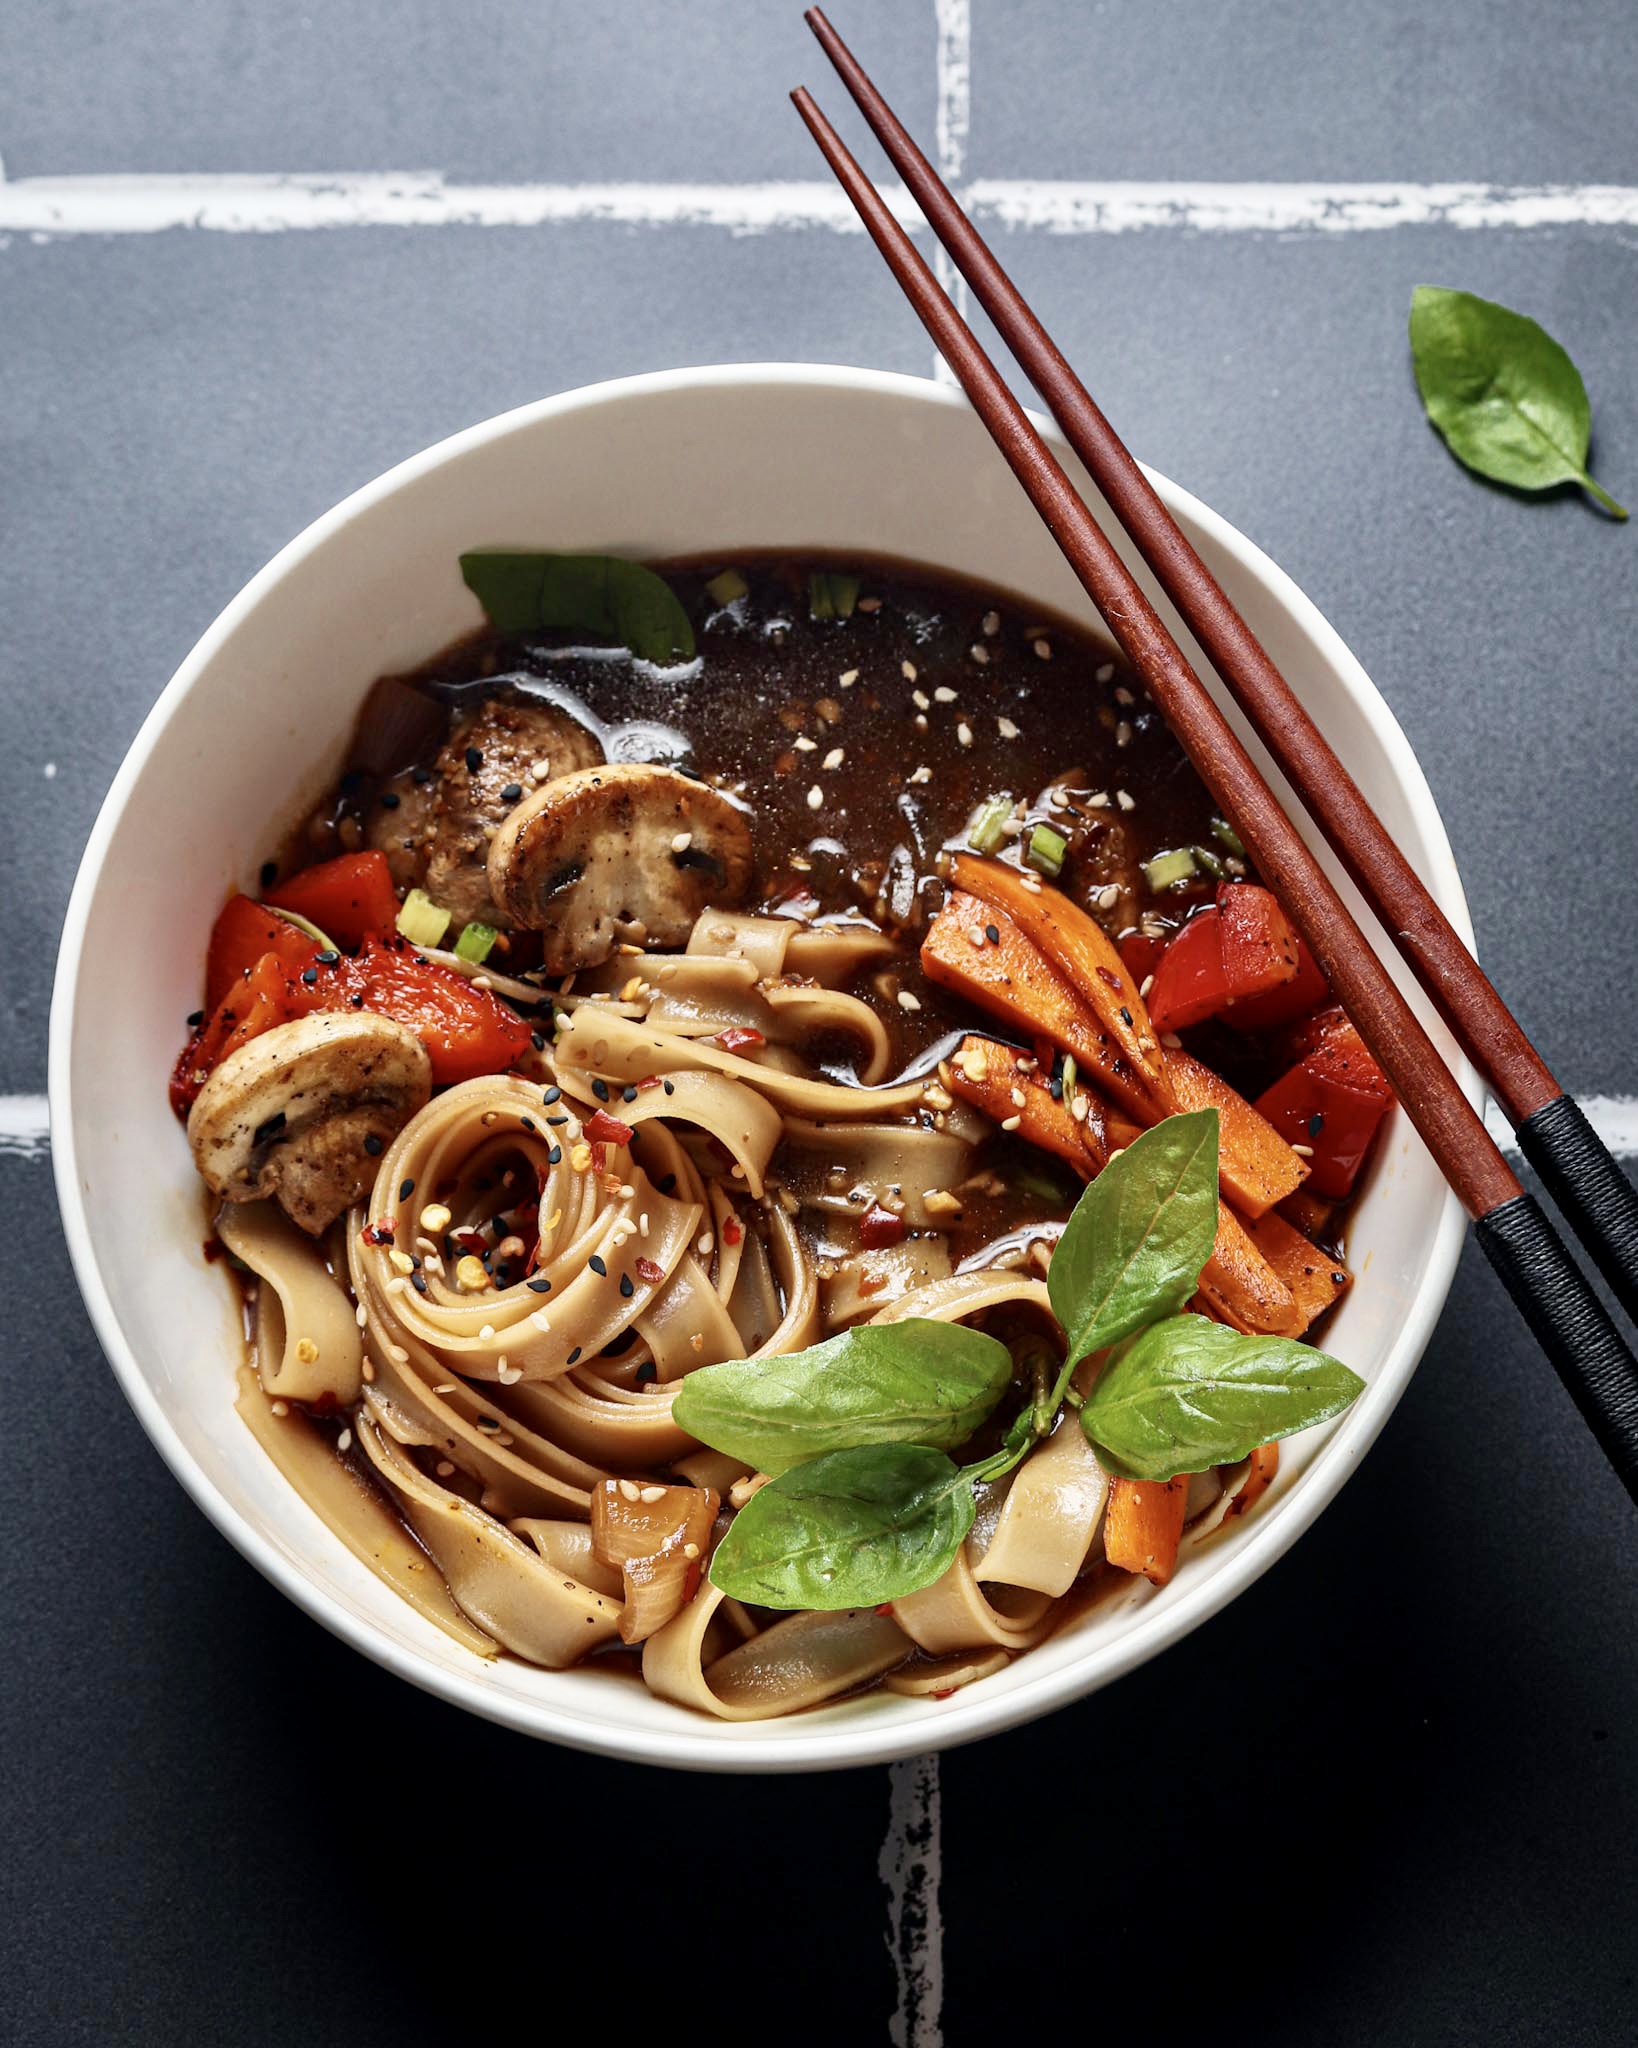
Noodles in Ginger Broth.
Another day and another noodles. Our love for noodles is evident with the number of times we make it in a month. Trying different options, flavours and varieties of noodles is something we look forward to.
Every time I try something different in noodles I remember my school days. There was a friend of mine whose mum used to make amazing noodles for her lunch box. We didn’t share our lunch boxes often, but during group lunches I always jumped at those noodles in her box. And every time I ate that I craved for more. I used to come back home and ask my mom to make the exact noodles but could never explain to her what I exactly was craving for and my mom would try different kinds of noodles to please me. Every trial of my mum was amazing but it couldn’t replicate the exact thing. There was no such thing as WhatsApp moms group at that time where she could go and ask for help for the exact recipe. Ah! I miss those simple days.
I make this vegan meal with homemade ginger and garlic broth, sautéed vegetables, fresh herbs and rice stick noodles. The addition of star anise in the broth gives it a beautiful and mild aniseed flavour which balances the ginger well. Love to garnish it with toasted sesame seeds, red chilli flakes and some spring greens.
This is such a simple, comforting and flavourful meal to come together.
If you like this recipe of noodles in ginger broth, please let me know in the comments below or connect with me on my Instagram and Facebook handles.
You may also like –
Vegan Balsamic & Basil Mushrooms with Soba Noodles
Hot & Spicy Chilli Garlic Noodles
Noodles in Ginger Broth
Arpita Darooka
Vegan, delicious, easy to make, comforting meal.
Prep Time 15 minutes mins
Cook Time 20 minutes mins
Course Main Course
Cuisine Chinese, Global
- 2 Portions Rice stick noodles Or any noodles of choice
- 100 Gms Mushrooms Sliced
- 1 Pc Onion Cubed
- 1 Pc Carrot - medium size Sliced
- 1 Pc Red bell pepper - small Cubed
- 2 Tbsp Garlic Minced
- 3 Tbsp Ginger Minced
- 1 Tbsp Soy sauce
- 1 Pc Star anise
- 1.5 Tsp Rice vinegar or apple cider vinegar
- 1/2 Tsp Sugar
- 3.5 Cups Water or veg broth
- Salt and black pepper As required
- 1.5 Tbsp Olive oil
Garnish
- Spring greens
- Toasted sesame seeds
- Red chilli flakes
- Basil leaves
Soak the rice noodles as per the packet instructions.
In a pot, add 2 tsps olive oil, sauté ginger and garlic until it begins to change colour. Add onions and let it cook until it becomes translucent.
Add in the water and let it come to a boil. Add soy sauce, star anise, a tsp of black pepper, vinegar salt and sugar. Cover and let it simmer for 15 mins.
Meanwhile, in a pan add a tsp of olive oil and sauté sliced mushrooms on medium high flame until they turn a bit soft and charred from the edges. Add a bit of salt and black pepper. Mix and remove from the pan.
Add another tsp of olive oil and sauté carrots and red bell peppers on medium high flame until they look cooked but maintain their crunch. Add a little salt and mix. Remove from the pan.
In the broth add the noodles and let it simmer until the noodles are cooked in the broth.
Taste and adjust seasonings in the broth.
Assemble - add noodles in a bowl, pour in a ladleful of broth ot two, add the sautéed vegetables and garnish.Enjoy!!!
Keyword how to make chinese noodles, Noodles in ginger broth, Noodles recipes, vegan noodles
Jun 19, 2021 | Snacks
Spicy Dal Pakodas (Indian yellow moong lentils fritters).
Who else have tried and totally love Lonavala’s moong dal pakodas? My family absolutely loves this fried goodness. Paired with chutneys of choice, this is a great snack on a rainy or winter evening.
Yellow moong dal soaked for few hours and then blended coarsely with rice, spices and chillies, and then fried to crisp perfection. Rice lends that required crunch and crisp texture to the pakodas. We as a family like our food a bit fiery, so my use of green chillies are high. Feel free to reduce the quantity as per your desired taste buds.
It does taste mouth watering and delicious. We love it with our cup of Indian masala chai.
Also, I would love to mention, that I recently read a book named “Pakodas” by Sangeeta M Khanna and I must say it does takes away a lot of notions around food fried at home. The age old methods are interesting and made me happy to read that fried food could be healthy too. Some of my key take-aways are adopting age old methods of frying, using cold pressed oil and not to let the oil heat upto a smoking point.
If you like this hot & spicy moong dal pakodas recipe, please write to me in the comments section below or connect with me on my social media handles.
You may also like the series of monsoon recipes.
Hot & Spicy Moong Dal Pakodas
Arpita Darooka
Hot and spicy, Indian vegan snack.
Prep Time 10 minutes mins
Cook Time 15 minutes mins
Soaking Time 4 hours hrs
Course Snack
Cuisine Indian
- 3/4 Cup Yellow moong dal Soaked for at least 4 hours.
- 1/4 Cup Rice Soaked for 30 mins.
- 5-6 Pcs Green chillies
- 1 Inch Ginger
- 1/4 Cup Coriander leaves chopped
- 1 Tsp Cumin seeds (jeera)
- 1/2 Tsp Carom seeds (ajwain)
- 1 Tsp Fennel seeds (saunf) Coarsely crushed
- 1 Tsp Red chilli powder
- Salt to taste
- Oil for frying preferably cold pressed oil
Blend coarsely all ingredients except coriander leaves and oil. Mix in coriander leaves. Whisk the batter with hands until it looks a bit fluffy (alternatively add a pinch of soda but that soaks more oil).
Heat oil on medium flame. Fry them in small balls until they turn golden brown and crisp. Ensure that the oil doesn’t smoke. Keep it on medium flame for even cooking.
Serve with chutneys of choice.Enjoy!!!
Keyword Hot and spicy moong dal pakodas, indian fritters recipe
Jun 18, 2021 | Drinks
Roasted Tomato & Garlic Soup.
The weather being so dreamy here right now that the only thing needed is a mug full of delicious soup. We combined this with oven roasted garlic vegetables and it was a happy and comforting meal. This could also be paired with breads of choice.
For this recipe, I roast tomatoes and garlic cloves along with olive oil, salt and pepper in the oven. While the tomatoes roast, I caramelise the onion slices in a pan. Then blend everything together. Add water, coconut milk, salt and pepper and let it cook on simmer for sometime. I serve this with burnt garlic or crunchy garlic granules on top. Doesn’t it sound super delicious?
I love the twist to this classic soup by adding creaminess with coconut milk and natural sweetness with caramelised onions. Add a bay leaf if you prefer while simmering the soup and remove it later. However, i have not used it in it yet. Also, if you like more heat in the soup, garnish with some red chilli flakes too.
If you like roasted tomato & garlic soup recipe, do let me know in the comments below or connect with me on my Instagram or Facebook handle.
Roasted Tomato & Garlic Soup
Arpita Darooka
Comfort meal/drink for rainy or winter evenings. Delicious, creamy and vegan.
Prep Time 15 minutes mins
Cook Time 15 minutes mins
Roasting Time 35 minutes mins
Course Drinks, Meals
Cuisine Global, Indian
- 3 Pcs Tomatoes - large
- 1/4 Cup Cherry tomatoes or substitute this with 1 additional large tomato.
- 5-6 Cloves Garlic
- 2 Tsp Garlic - minced
- 1 Pc Onion - large Sliced
- 3+1 Tbsp Olive oil
- Salt to taste
- Black pepper to taste
- 1/4 Cup Coconut milk Or use 1/8 cup fresh cream
- 1/2 Tsp Sugar optional
- 1/2 Cup Water
- Garlic granules to garnish.
In a baking pan, place the tomatoes, garlic, 3 tbsp olive oil, salt and black pepper and roast them in a pre heated oven at 170 C (fan assisted) for 35 mins.
While the tomatoes roast, heat a tsp olive oil in a pan and sauté sliced onions until it caramelises (turns golden brown).
Remove the tomatoes from the baking pan, and deglaze the pan. Collect all the juices and scrap the bits in there. In a blending jar, add the roasted tomatoes, collected juices and bits, caramelised onions and blend until smooth.
Now if you like smooth soup, seive it through a fine mesh strainer. I like to keep the fibre so I use wide gap strainer and just discard the larger un-blended bits.
In a pan, again heat 1 tsp olive oil, add minced garlic, sauté until it changes colour. Add the soup mix and water and let it come to a boil. Add salt and ground black pepper. Lower the flame and add coconut milk. Let it cook covered on sim for 15 mins. Taste and adjust seasonings.
Garnish and enjoy!!!
Substitute coconut milk with fresh cream. Reduce the quantity of fresh cream to half.
If the coconut milk looks curdled while cooking, just give it a good stir and it will be fine. It’s normal and doesn’t change the texture, taste or property of coconut milk. Keyword roasted tomato and garlic soup recipe, soup recipes, Tomato and garlic soup