Jul 29, 2021 | Condiments and spices
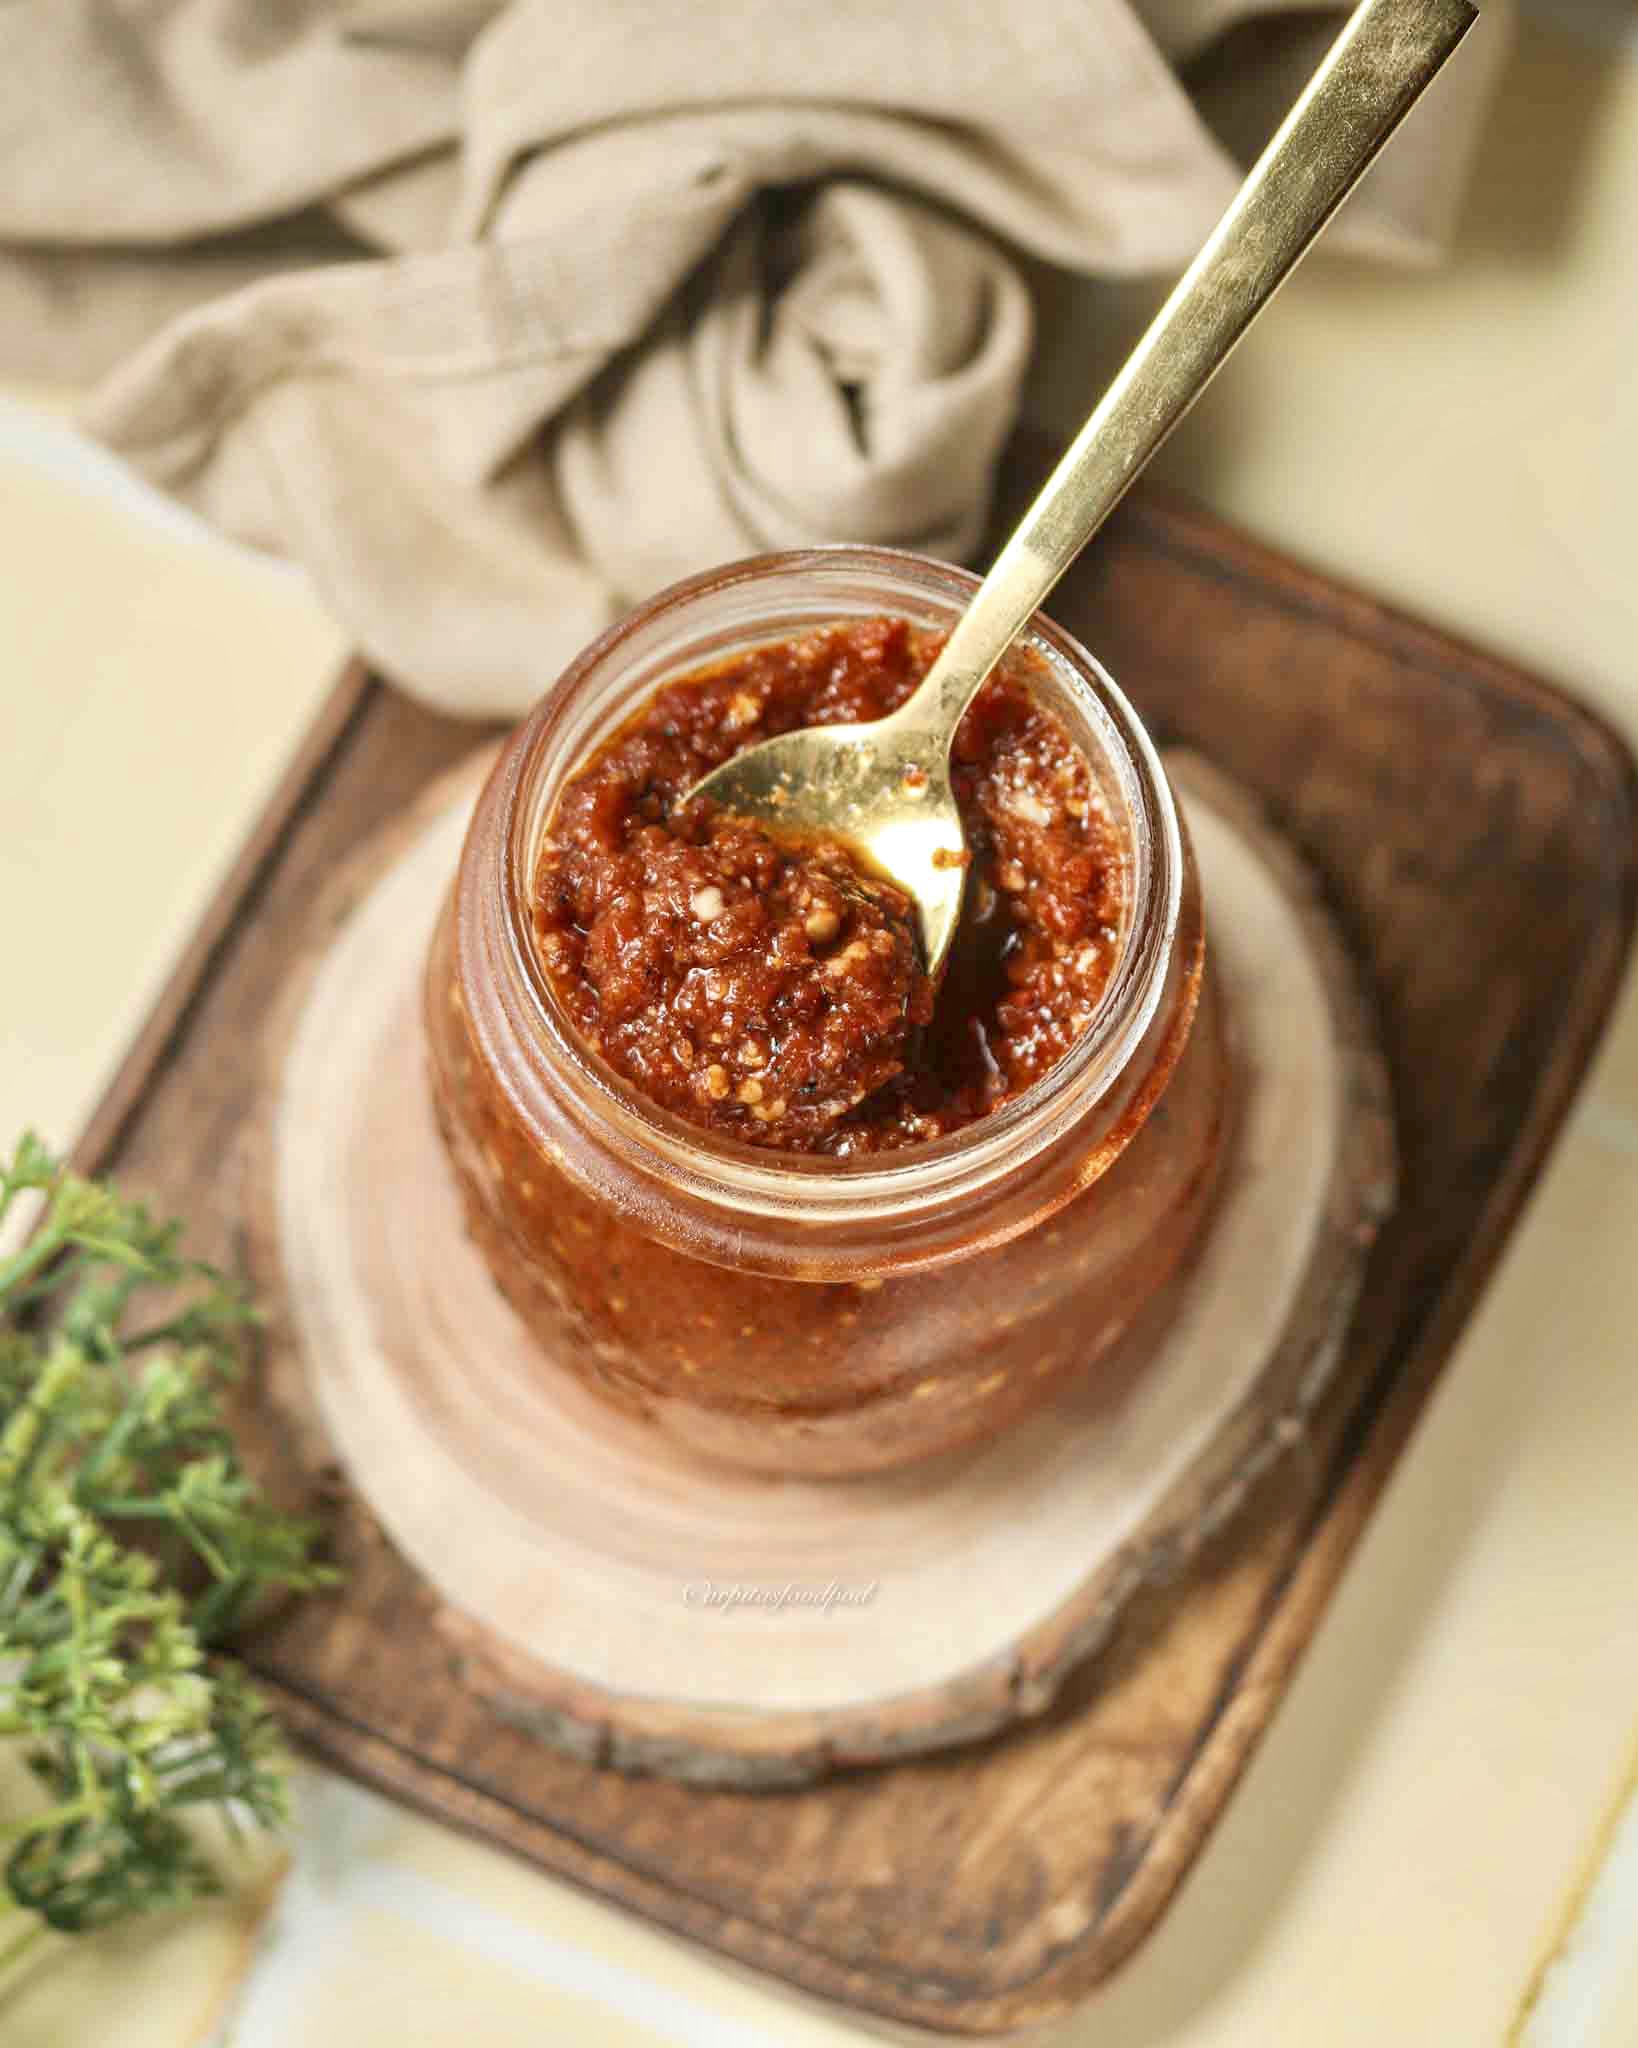
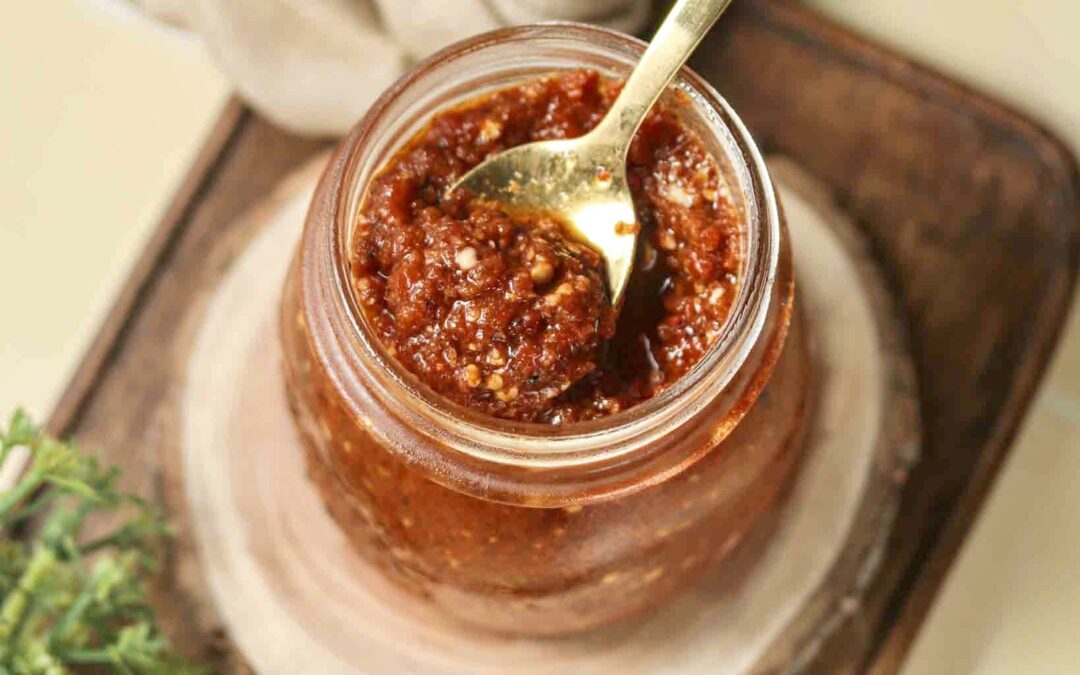
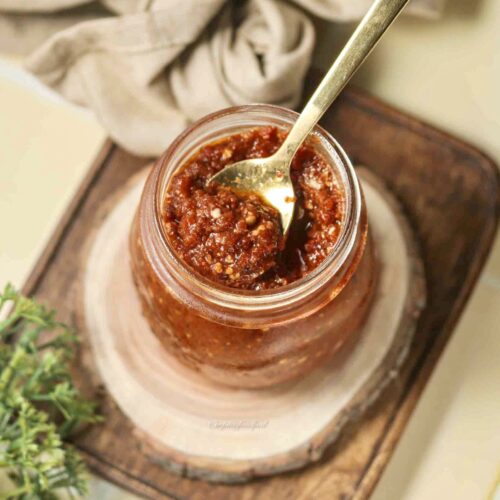
Harissa Sauce.
This one is a spicy, hot, smoky chilli sauce and by far, the best ever sauce I have made. Packed with amazing flavours, it is simple to make. The heat levels could be modified as per personal preference. This North African sauce is versatile and modified as per individual’s taste. After a few versions of it, I have finally settled with this recipe which perfectly suits my taste buds. It’s truly addictive! I use it for my pastas, salads, patties, or mix it with yogurt for flavourful dip.
How to make harissa sauce?
To start with, roast two red bell peppers on open flame until its charred from all sides. Keep it in the bowl and cover it. Let it rest so the smoky flavour gets infused in the bell peppers. Then, again roast three tomatoes on the open flame until charred again from all sides. Keep it in the same bowl and cover. In a pan dry roast 3-4 garlic cloves until charred. Keep aside. In the same pan, dry roast a tsp each of cumin seeds and coriander seeds and half a tsp of fennel seeds until fragrant. Grind the spices in a spice grinder and keep aside.
Remove the skin of charred bell peppers and tomatoes. In a bowl, add in the tomatoes, bell peppers, garlic, 10-12 red bird eye chillies. Now by using a hand blender, blend it into a coarse paste. Alternatively put it all into a food processor to make a coarse paste.
Heat 2 tbsp olive oil in a pan. Add the coarse paste and let it cook for a couple minutes. Add salt and ground spices. Continue to cook it for 7-8 mins until the paste begins to thicken up. Add half a tsp of coconut sugar/jaggery/sugar and 2 tsp lemon juice. Mix it well and switch off the flame. Let it cool to room temperature and store it in a airtight jar. While this could be consumed immediately, it’s recommended to leave it in the refrigerator for at least 2-3 days for the flavours to mature.
How long can this be stored for?
This would be stored for upto 10 days in the refrigerator in an airtight jar.
If you like this harissa sauce recipe, please let me know your thoughts in the comments below. You can also connect with me on my Instagram and Facebook handle.
You may also like –
Smashed Potatoes with Harissa Yogurt Sauce
Harissa Sauce
Arpita Darooka
Hot, spicy, smoky sauce which is simple to make and is versatile to use in tons of food options.
Cook Time 30 minutes mins
Course Condiments, sauce
Cuisine African, Global
- 2 Pcs Red bell peppers - medium to large size
- 3 Pcs Tomatoes - medium size
- 10-12 Pcs Red bird eye chillies
- 3-4 Cloves Garlic
- 1 Tsp Cumin seeds
- 1/2 Tsp Fennel seeds
- 1 Tsp Coriander seeds
- 1/2 Tsp Sugar/jaggery/coconut sugar
- 2 Tsp Lemon juice
- Salt to taste
- 2 Tbsp Olive oil
Roast red bell peppers on open flame until charred from all sides. Remove from the flame and Keep it in the bowl and cover it. Let it rest so the smoky flavour gets infused in the bell peppers.
Then, again roast tomatoes on the open flame until charred again from all sides. Keep it in the same bowl and cover.
In a pan dry roast garlic cloves until charred. Keep aside. In the same pan, dry roast a tsp each of cumin seeds, fennel seeds and coriander seeds until fragrant. Grind the spices in a spice grinder and keep aside.
Remove the skin of charred bell peppers and tomatoes. In a bowl, add in the tomatoes, bell peppers, garlic, red bird eye chillies. Now by using a hand blender, blend it into a coarse paste. Alternatively put it all into a food processor to make a coarse paste.
Heat 2 tbsp olive oil in a pan. Add the coarse paste and let it cook for a couple minutes. Add salt and ground spices. Continue to cook it for 7-8 mins until the paste begins to thicken up.
Add coconut sugar/jaggery/sugar and lemon juice. Mix it well and switch off the flame. Let it cool to room temperature and store it in a airtight jar. While this could be consumed immediately, it’s recommended to leave it in the refrigerator for at least 2-3 days for the flavours to mature.Enjoy!!!
Keyword harissa paste, Harissa sauce
Jul 25, 2021 | Mains
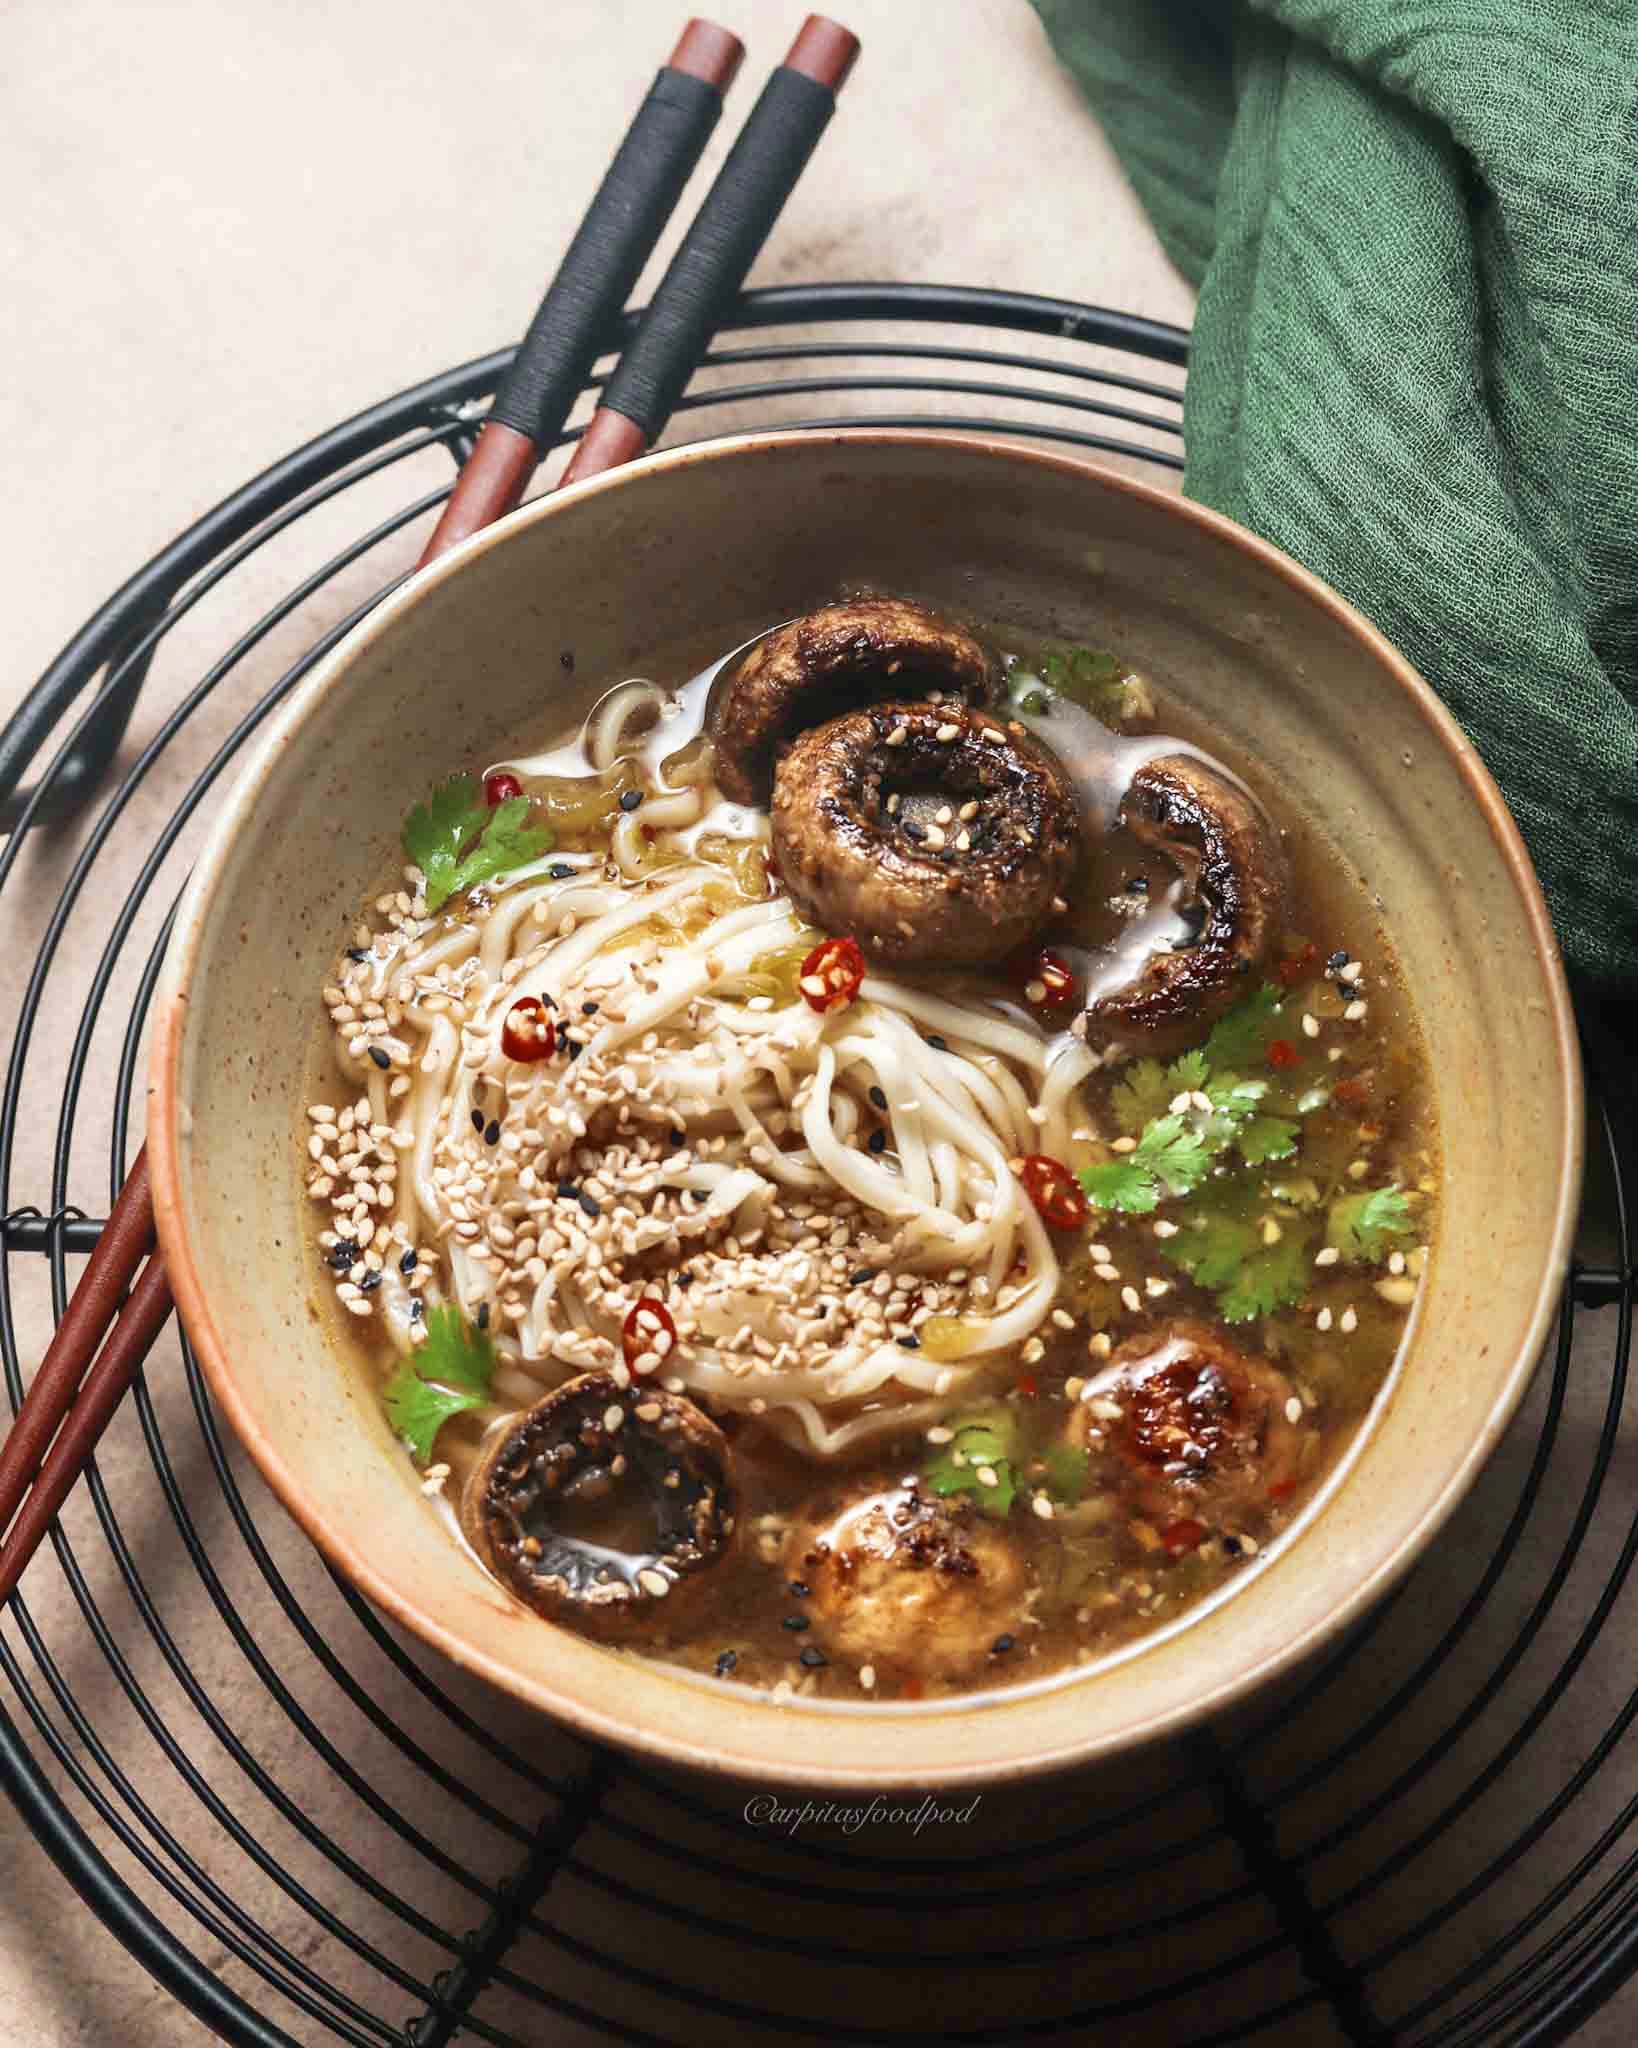
Miso Noodle Soup.
I crave for meals like these when there is a downpour or a nip in the air. These are so comforting and fills you with warmth. Those who know me, they know I love to make and eat noodles and pastas. Experimenting and playing around with flavours is my favourite thing to do on when I have free time.
This vegan soup is clear broth with noodles and sautéed mushrooms dunked into it. I cannot emphasise enough how comforting it turned out to be and the umami flavour that miso brings in.
How to make this noodle soup?
I recommend making the soup/broth at the time of consumption. Heat a couple tsps of sesame oil in a soup pot. Add crushed ginger, garlic and green chillies and sauté for a few minutes until they begin to change colour. Add enough water. Mix in miso paste, a dash of soy sauce, salt, black pepper, dried herbs, and a few cilantro leaves. Let it simmer, covered for around 25 – 30 minutes. Now, sauté mushrooms in a tsp of sesame oil and some more garlic if preferred. Once they caramelise add a little salt. Boil noodles of choice as per packet instructions.
Assemble the soup bowl – place a portion of noodles in the bowl, top it up with miso soup, add the mushrooms and some more greens. Sprinkle enough black and white toasted sesame seeds. Tip in red chillies if preferred and slurppp away!
What else could be added in the soup?
Feel free to add more veggies of choice like green beans, carrots, squash and more. More seasonal greens like spinach, bok choy, spring greens and more, would make a great addition too. Also, proteins of choice like tofu, meat or eggs.
Can this soup be stored for later?
Preferably it should be consumed fresh. But if at all, this can be stored in the refrigerator in a tightly sealed container for upto 2 days. Just ensure reheating doesn’t make it reach to boiling point.
If you try this miso noodle soup recipe, please let me know in the comments below or chat with me on my Instagram or Facebook handle.
You may also like –
Vegan Balsamic & Basil Mushrooms with Soba Noodles
Hot & Spicy Chilli Garlic Noodles
Miso Noodle Soup
Arpita Darooka
Vegan, comforting, umami soup with noodles and sautéed mushrooms dunked in.
Prep Time 15 minutes mins
Cook Time 30 minutes mins
Course Soup
Cuisine Asian, Global
- 2 Portions Noodles of choice Whole wheat or rice.
- 150 Gms Cremini Mushrooms or any mushroom of choice
- 1.5 Tsp Sesame oil
- 1 Tsp Garlic Minced
- Salt to taste
Miso Soup
- 3 Cups Water
- 2 Tbsps Ginger, garlic and green chillies Crushed in a chopper
- 1 Tsp Sesame oil Cold pressed
- 1/2 Tsp Soy sauce
- 2 Tsps Miso paste
- 1/2 Tsp Dried herbs
- 1 Tbsp Cilantro Chopped
- Salt and black pepper to taste
Garnish
- Cilantro, sesame seeds, red chillies optional
Soup
In a soup pot, heat sesame oil and add ginger, garlic and green chillies. Sauté for 5-6 mins until it begins to change colour.
Add water and rest of the soup ingredients. Cover and simmer it on low flame for 25 - 30 mins.
Taste and adjust seasonings.
Noodles and mushrooms
While the soup simmers, boil noodles in salt water as per packet instructions. Drizzle oil and keep aside.
Heat sesame in a pan and sauté garlic for a min. Add cleaned mushrooms. Do not stir the mushrooms. Let them cook on one side until they turn brown and then turn them to get cooked on the other side. Add little salt (remember there is salt in soup and noodles too).
Assemble soup
In a bowl, add a portion of noodles.Pour in a few ladles of soup/broth. Tip in the mushrooms or any other veggies or green if using.
Garnish with black and white toasted sesame seeds, more cilantro and red chillies.
Keyword miso noodle soup, noodle soup, umami
Jul 24, 2021 | Mains
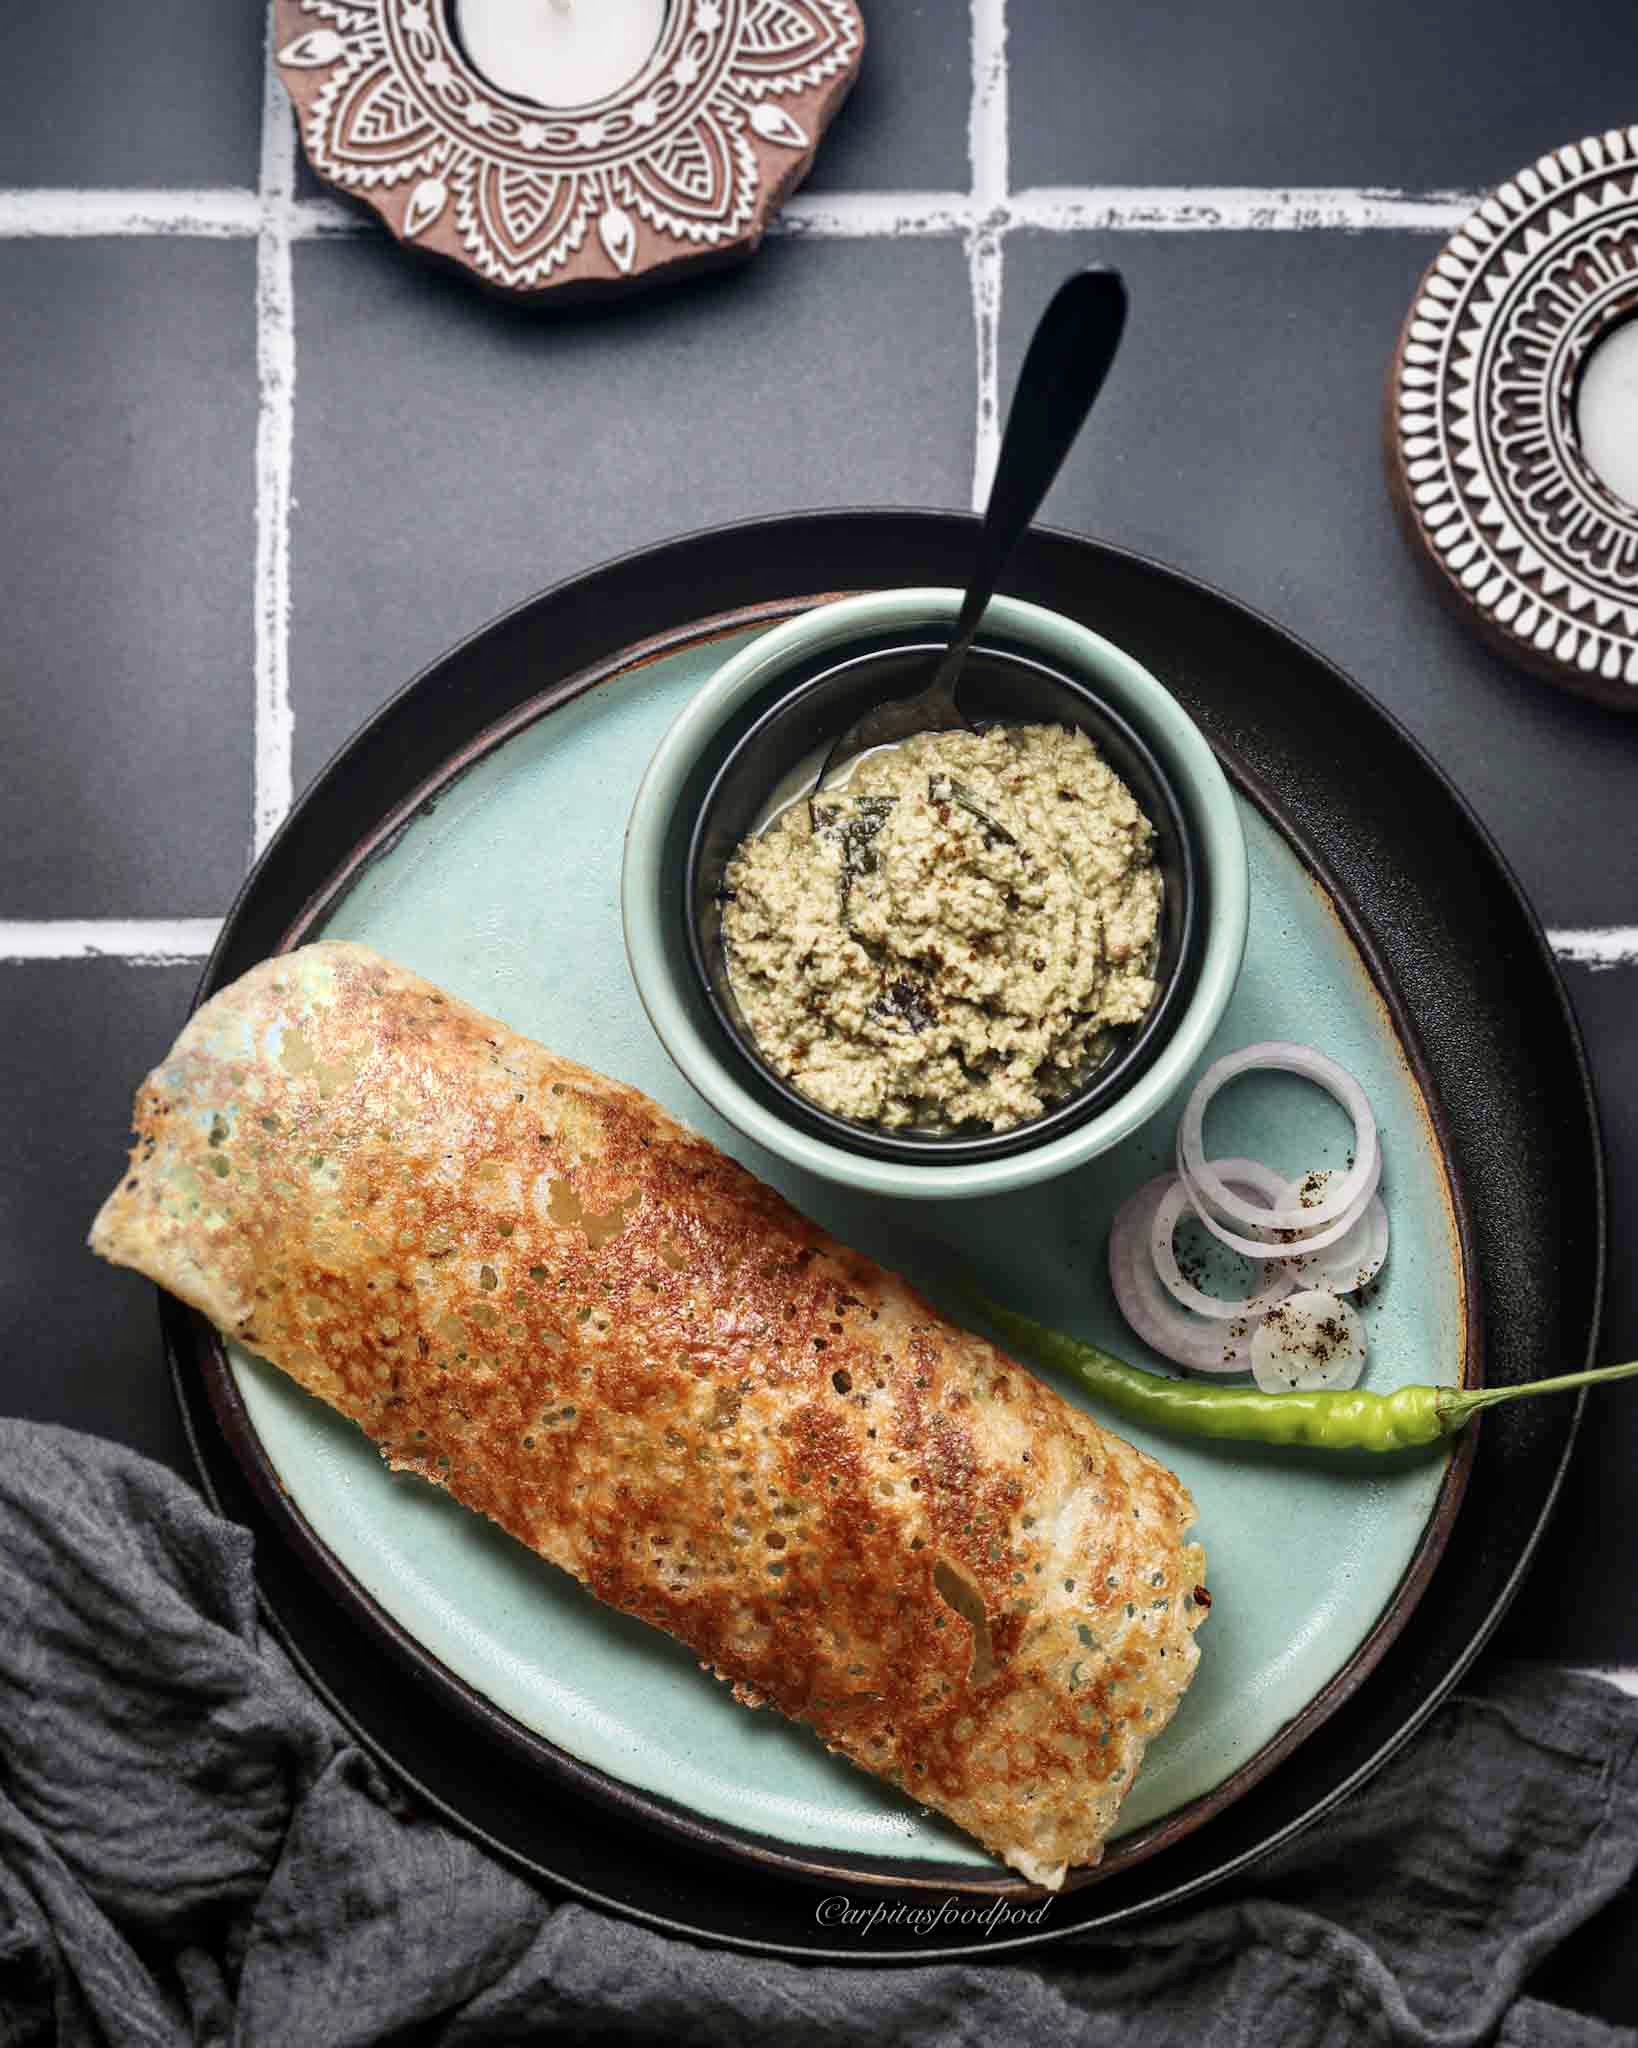
Instant Rava Dosa.
This is another South Indian dosa made with semolina, rice flour and whole wheat flour. Traditionally all purpose flour or maida is used for this, but I like to include healthier ingredients in my meals. And, I promise, the taste isn’t compromised.
How to make it?
In a bowl, mix rava, whole wheat flour and rice flour. Add in sour curd and water and soak everything for 20 mins. Mix in loads of finely chopped green chillies, ginger . Then stir in the salt and cumin seeds. Add more water if needed to make the batter in thin consistency. Heat a griddle on medium flame and brush it with oil. Pour a couple ladleful of batter and let it spread on it’s own. Add a tsp of oil on top and let it cook on medium until golden brown and crisp on one side. Flip and cook from the other side. Fold and serve with coconut chutney (recipe linked below).
Points to remember –
* Use only water for vegan option. Curd is optional.
* Ensure the batter is of thin watery consistency for crisp dosas.
If you like this instant rava dosa recipe, let me know your thoughts in the comments below. You can also connect with me on my Instagram and Facebook handle.
You may like to make –
Coconut peanut coriander chutney
Instant ragi dosa
Instant Rava Dosa
Arpita Darooka
Healthy and delcious breakfast or meal made with minimal and staple Indian pantry ingredients.
Prep Time 5 minutes mins
Cook Time 30 minutes mins
Resting Time 20 minutes mins
Course Main Course
Cuisine Indian
- 1/2 Cup Rava/semolina flour
- 1/4 Cup Rice flour
- 2 Tbsp Whole wheat flour
- 4-5 Pcs Green chillies Crushed/finely chopped
- 2 Inches Ginger
- 2 Tsp Cumin seeds
- Salt to taste
- 2.5 Cups Water
- 2 Tbsp Curd Optional
Mix rava, whole wheat flour, rice flour, curd and water. Let it rest for 20 mins.
Mix in green chillies, salt, cumin seeds, ginger.
If the mix appears thick, add more water. It should be of watery consistency
Heat a griddle on medium flame and brush it with oil.
Add a couple ladlefull of batter and spread it gently.
Add a half a tsp or a tsp of oil over it and let it get crisp from one side.Flip and cook from the other side. Remove from the pan.Enjoy!!!
Keyword dosa recipe, instant dosa recipe, Instant rava dosa
Jul 23, 2021 | Mains
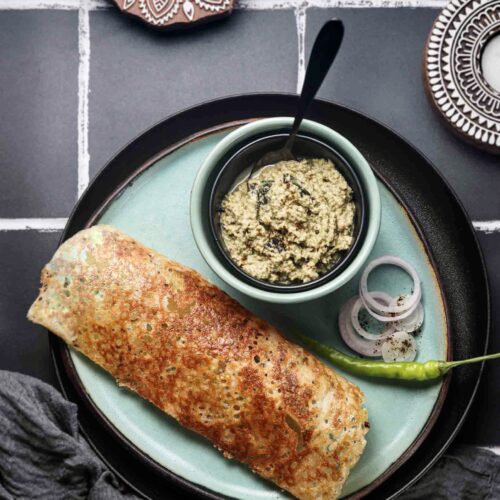
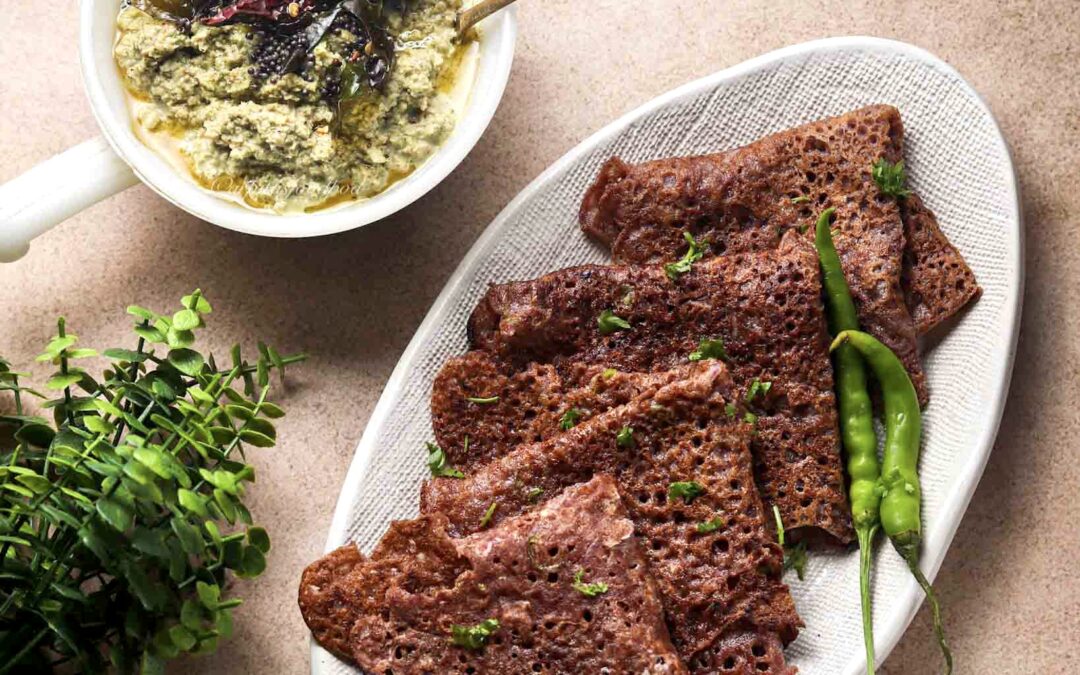
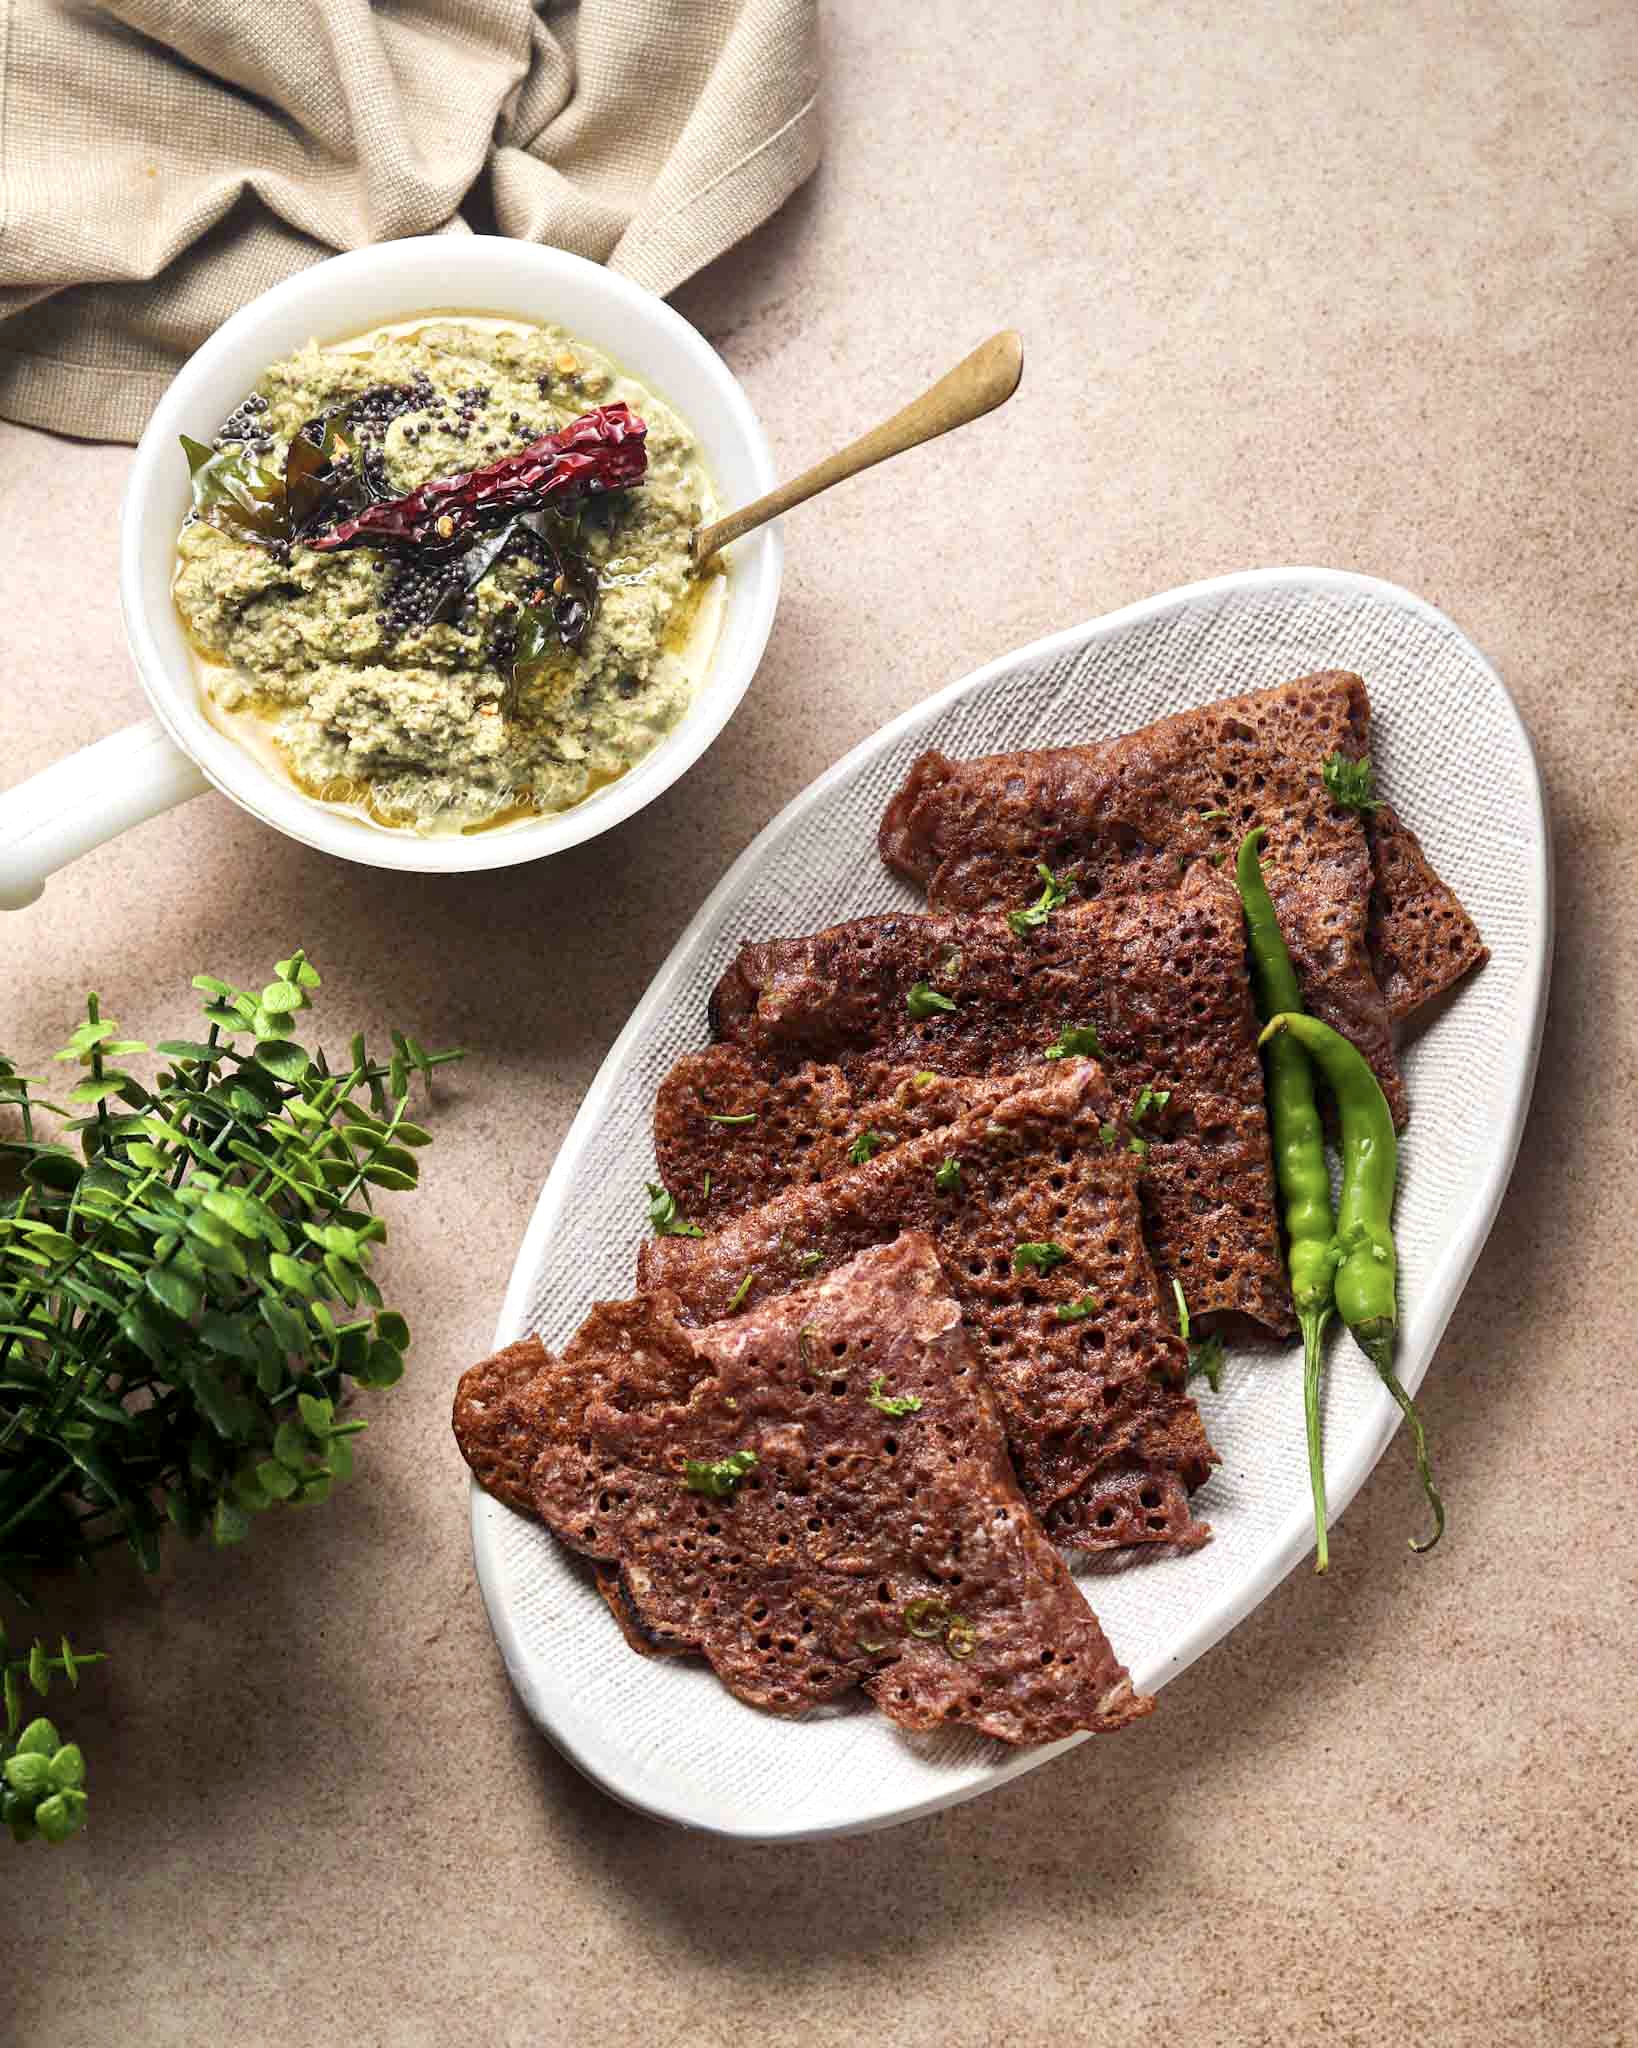
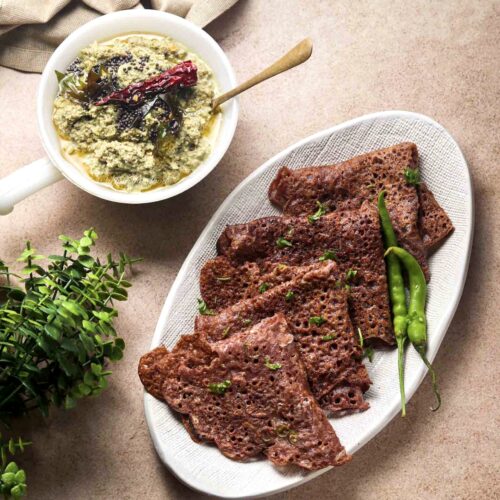
Instant Ragi Dosa | Instant Finger Millets Dosa.
This is a healthy meal option from South Indian cuisine made with finger millets. We also call it ragi or nachni. This is a staple in many parts of Southern India to make dosa and idli with ragi. I like how simple and easy it is to make and doesn’t require much planning or prepping. This is my version of instant meal when I really cannot think of a better option.
How to make it?
In a bowl, mix ragi flour and rice flour. Add in sour curd and water and soak everything for 15 mins. Mix in finely chopped green chillies, ginger and onion. Stir in the salt and cumin seeds. Add more water if needed to make the batter in thin consistency. Heat a griddle on medium flame and brush it with oil. Pour a couple ladleful of batter and let it spread on it’s own. Add a tsp of oil on top and let it cook on medium until golden brown and crisp on one side. Flip and cook from the other side. Fold and serve with coconut chutney (recipe linked below).
Points to remember –
* Use only water for vegan option. Curd is optional.
* Ensure the batter is of thin watery consistency for crisp dosas.
If you like this instant ragi dosa recipe, let me know your thoughts in the comments below. You can also connect with me on my Instagram and Facebook handle.
You may like to make along –
Coconut peanut coriander chutney
Instant Ragi Dosa
Arpita Darooka
Make instant finger millet dosa with this simple and super easy recipe. It is a healthy meal for kids and adults.
Prep Time 5 minutes mins
Cook Time 30 minutes mins
Resting Time 15 minutes mins
Course Main Course
Cuisine Indian
- 1/2 Cup Ragi flour
- 1/4 Cup Rice flour
- 1/4 Cup Curd
- 3-4 Pcs Green chillies Finely chopped
- 1 Pc Onion - large Finely chopped
- Salt to taste
- 1.5 Tsp Cumin seeds
- 1.5 Inch Ginger Crushed
- Oil as required To cook the dosas
- 2 Cups Water Or more as required
Mix ragi flour, rice flour, curd and water. Let it rest for 15 mins.
Mix in chopped onions, green chillies, salt, cumin seeds, ginger.
If the mix appears thick, add more water. It should be of watery consistency.
Heat a griddle on medium flame and brush it with oil.
Add a couple ladlefull of batter and spread it gently.
Add a half a tsp or a tsp of oil over it and let it get crisp from one side.
Flip and cook from the other side. Remove from the pan.Enjoy!!
Keyword dosa recipe, instant dosa recipe, instant ragi dosa, Ragi dosa, south indian meal
Jul 22, 2021 | Condiments and spices
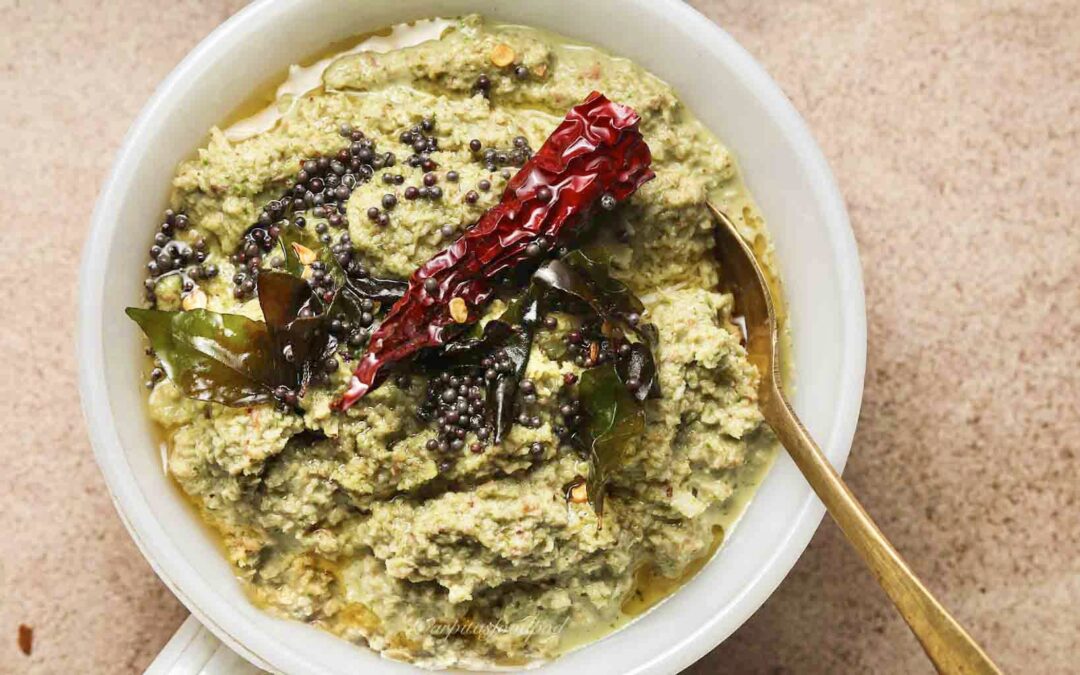
Coconut Peanut Coriander Chutney.
Coconut chutney is a classic South Indian condiment. This one is relished as a side with a lot of breakfast dishes and snacks. My favourite one being with dosas and idlis. Over the years, there are a lot of versions of this classic chutney have come up based on personal preferences.
I am today writing the recipe for my favourite chutney here, which is so simple to make and super quick too.
How to make the chutney?
Use either fresh or frozen grated coconut for this. Roast a few peanuts and cool them. Mix in coconut, peanuts, coriander leaves, salt, and green chillies and garlic and grind them along with water as per the desired consistency. Temper it by heating a little coconut oil or groundnut oil, sizzle mustard seeds in it, a few curry leaves and dried red chilli. Pour in over the chutney and mix well. Exact measurements and process is in the recipe card below.
How to store it?
This chutney is best when consumed within 4-5 hours of making it. But it could be stored in the refrigerator for upto two days in an airtight container. I usually like to temper it again to get it back to its fresh state if consuming later.
What do you eat it with?
You could eat this with dosa, idli, uttapam, vada, pongal, appe, bonda and more. I also eat it with poha (that’s how it used to be served in my office cafeteria in Pune) and I am not complaining :).
If you like this coconut peanut coriander chutney recipe, let me know your thoughts in the comments below. You can also connect with me on my Instagram and Facebook handle.
You may also like –
Marwari Hot Garlic Chutney
Coconut peanut coriander chutney
Arpita Darooka
Vegan condiment served with traditional South Indian delicacies.
Prep Time 10 minutes mins
Cook Time 3 minutes mins
Course chutney, Condiments, Dip
Cuisine Indian
- 1/2 Cup Grated coconut
- 1/4 Cup Coriander leaves
- 3 Tbsp Roasted peanuts
- 2 Pcs Green chillies
- 2-3 Cloves Roasted garlic cloves
- Salt to taste
- 1/3 Cup Water
Tempering
- 2 Tsp Groundnut oil or coconut oil
- 1 Tsp Mustard seeds
- 6-7 Pcs Curry leaves
- 1 Pc Dry red chilli
Dry roast peanuts and garlic.
Mix in all the ingredients and blend it to desired consistency.
For tempering - heat oil in a termpering pan, add mustard seeds and let it crackle. Add red chilli and curry leaves. Sauté for a few seconds.
Pour the tempering over the chutney and mix it well.Enjoy!!!
Keyword chutney recipes, coconut chutney, coconut peanut coriander chutney