Jul 19, 2021 | Mains

Paneer In Mint & Coriander Curry.
This is also called known as Hariyali Paneer because of the dominant greenish colour of the gravy. Often confused with palak paneer (paneer in spinach gravy), this one doesn’t traditionally doesn’t have spinach. This gets it’s flavours from mint, coriander and whole spices. However, for a brighter shade of green, a few spinach leaves can be added, when in season.
Paneer is pretty much one of the favourite ingredient for me to work with. My family and I, love paneer in different varieties. And this is one dish which makes me happy and contended with food.
To make this, I dry roast some whole spices until they turn fragrant and then blend it along with fresh mint and coriander leaves. The textures come together with addition of coconut milk. To make this vegan, swap the paneer with tofu, and ghee with cooking oil. Rest of the measurements and ingredients remains the same.
If you like this paneer in mint & coriander curry recipe, please leave me a comment below or connect with me on my Instagram and Facebook handle. I would love to hear from you.
You may also like –
Indian Kadhai Paneer
Indian Matar Paneer Gravy
Paneer Bhurji
Paneer In Mint & Coriander Curry
Arpita Darooka
Delicious and flavourful curry made with basic greens and freshly ground spices.
Prep Time 10 minutes mins
Cook Time 25 minutes mins
Course Main Course
Cuisine Indian
- 200 Gms Paneer (cottage cheese) or tofu for vegan option
- 1/2 Cup Coriander leaves
- 1/4 Cup Mint leaves
- 1/2 Cup Onion Chopped
- 6-7 Cloves Garlic
- 1 Inch Ginger
- 3-4 Pcs Green chillies
- 1/2 Tsp Cumin seeds
- 1/2 Cup Coconut milk
- 2 Tbsp Fresh cream or coconut cream (optional) Skip if using thick coconut milk.
- Salt to taste
- 1/4 Tsp Kasuri methi
- 1 Tsp Lemon juice
- 1/4 Cup Water
- 2 Tbsp Ghee Or oil for vegan option
- 1 Tsp Oil
Whole spices
- 1 Tsp Cumin seeds
- 6-7 Pcs Whole black peppercorns
- 1/2 Inch Cinnamon
- 2 Pcs Green cardamom
- 1 Pc Black cardamom
- 1.5 Tbsp Coriander seeds
- 1/4 Tsp Nutmeg Grated
- 1/2 Inch Mace
- 2-3 Pcs Cloves (laung)
In a pan, dry roast the whole spices along with green chillies and garlic. Roast until they get fragrant. Takes about a minute and half. Take it off the flame and let it cool to room temperature.
In a blender, blend together the spices, garlic, green chillies, mint and coriander leaves. Add 2 tbsp cup ice cold water and 2 ice cubes while blending. This maintains the fresh colour of the greens.
Heat oil and ghee (or oil if vegan) in a pan, and add 1/2 tsp cumin seeds. Let it sizzle and add onions. Sauté onions until it turns golden brown. Takes about 5-6 mins. Now add grated ginger and cook it for 30 secs.
Add the coriander and mint paste. Cook it all for 5 mins or until it releases oil.
Add coconut milk and mix it well. Add fresh cream (if using), water and salt. Cook it covered on low flame for another 3-4 mins or until the oil floats on top.
Taste and adjust seasonings. Add kasuri methi and lemon juice and switch off the flame immediately.
Garnish with more coconut cream or fresh cream and a few mint leaves. Serve with flatbreads of choice.Enjoy!!!
Keyword paneer in mint & coriander curry, paneer recipes
Jul 13, 2021 | Snacks
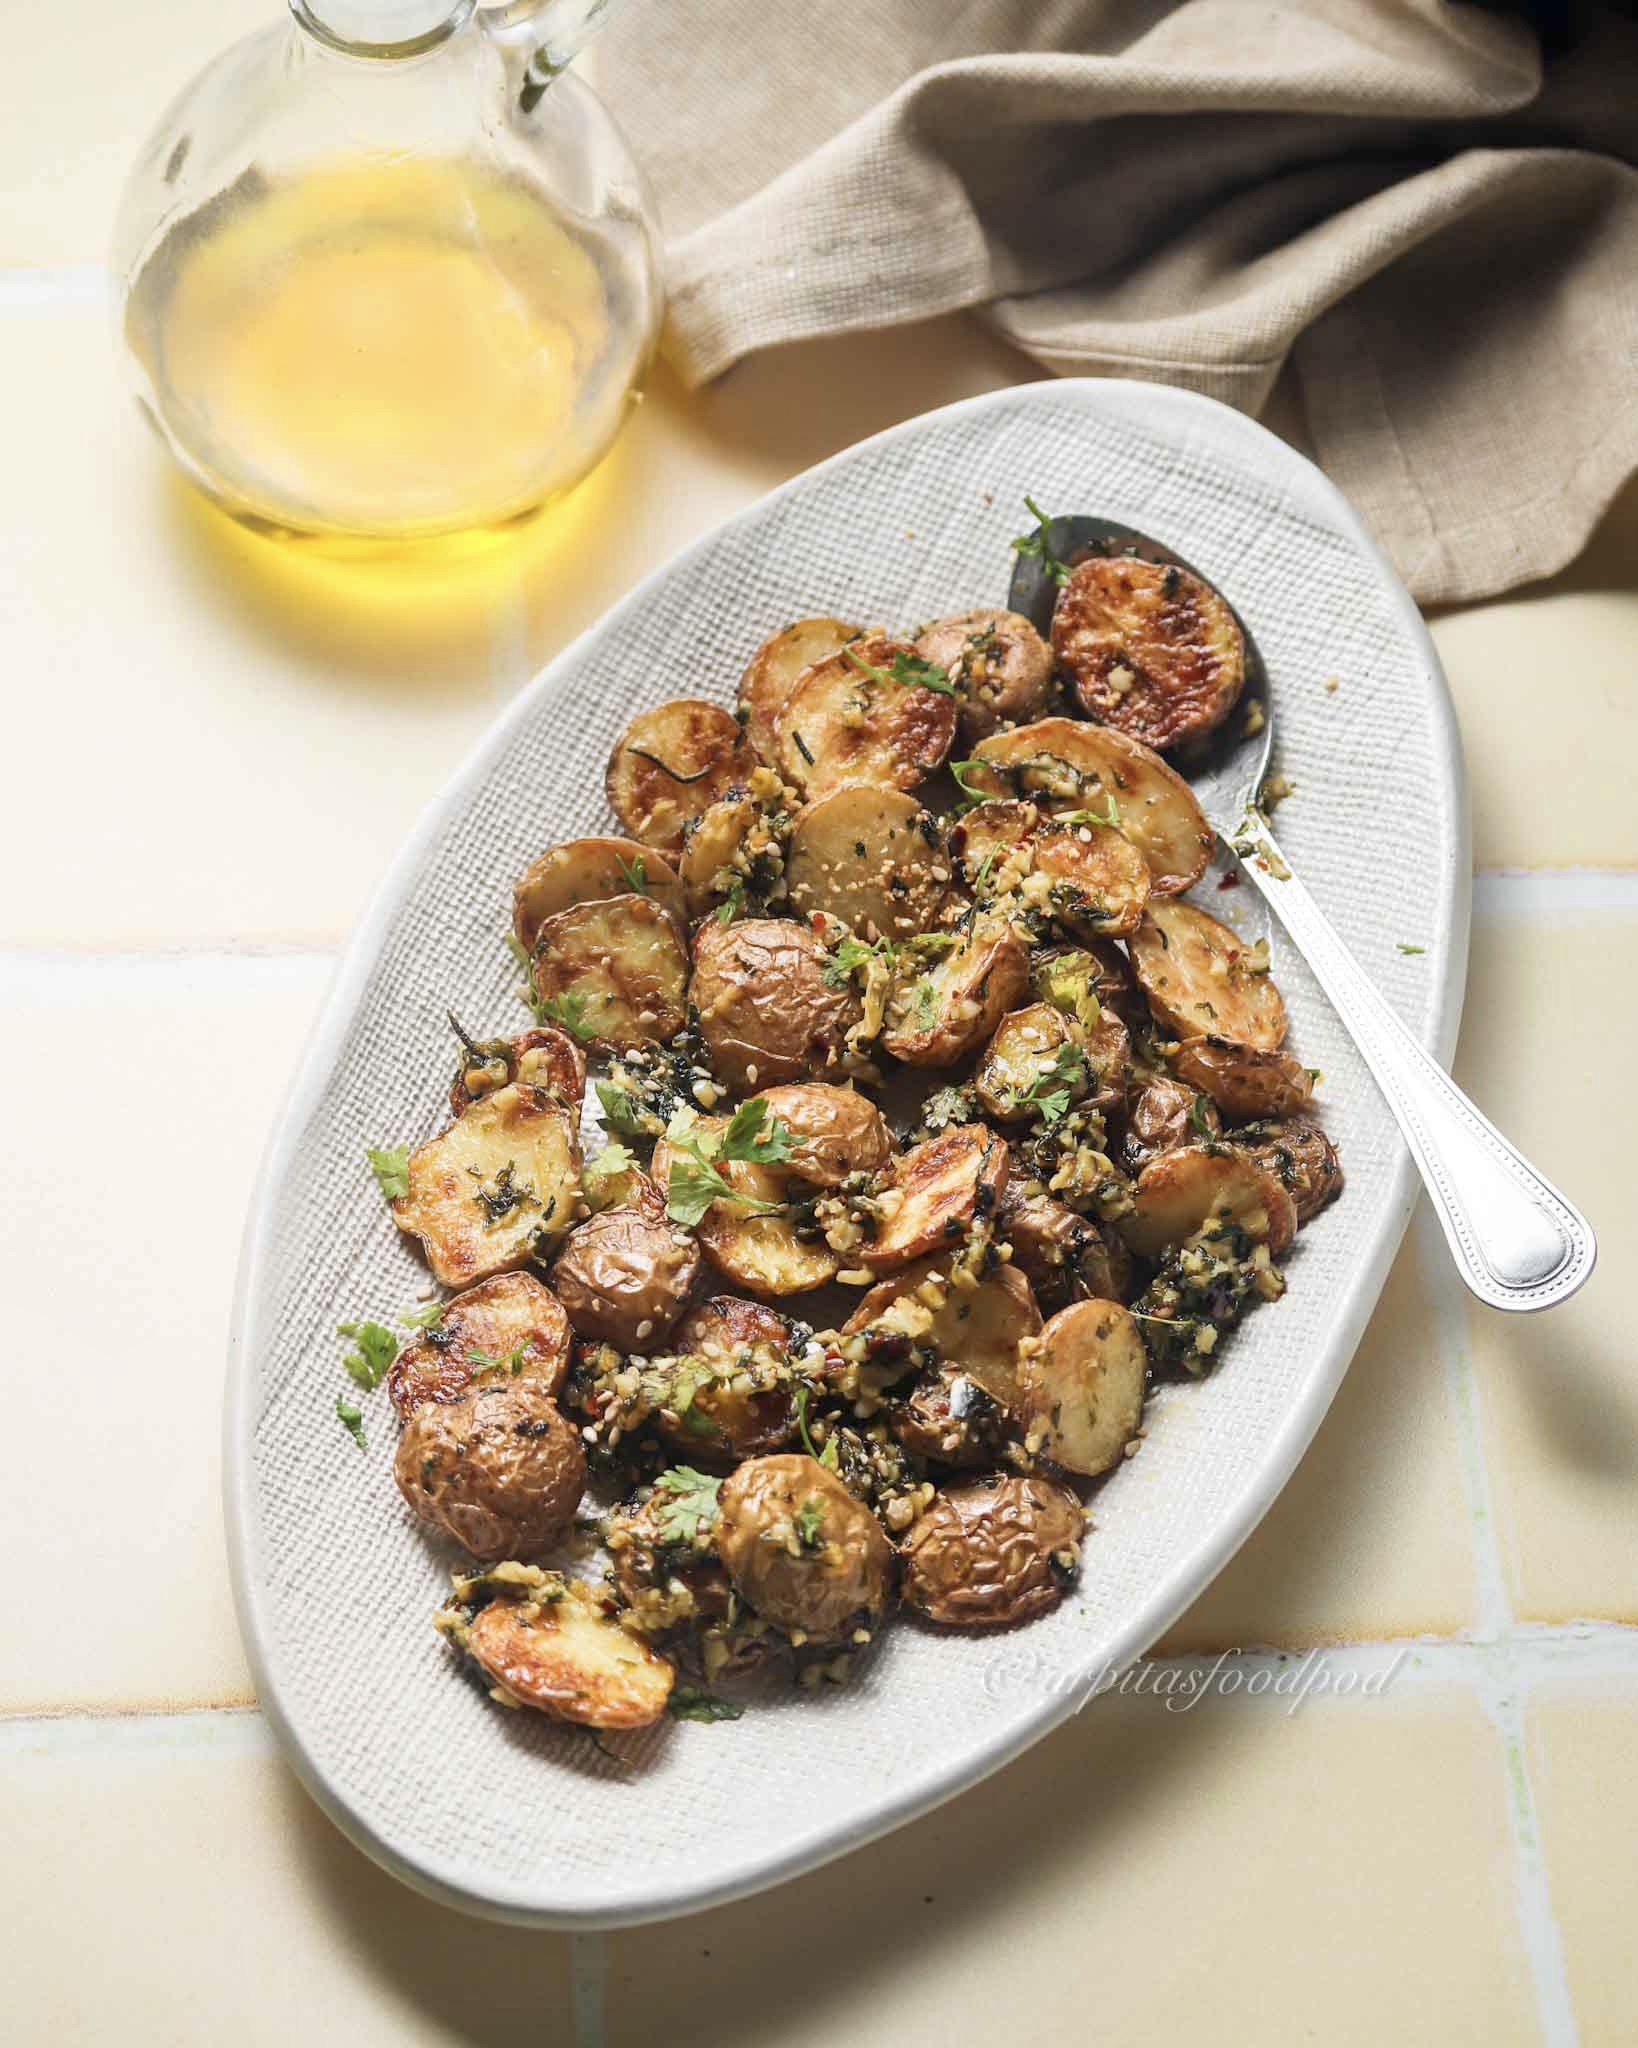
Garlic Lemon & Herbs Roasted Potatoes.
Potatoes are one of my favourite vegetables. Whether as a stir fry to pair well with Indian food or baked potatoes as a side or snack or even a soup, I love it in it’s every form.
Ever since Mehul (my husband) has started working from home during this pandemic, he sometimes gets this hunger pangs towards evening. I usually try to make roasted vegetables or potatoes or a quick stir fry to satiate our small hunger pangs. While these take a little while to get roasted, it certainly doesn’t require much efforts. Put this in the oven to roast, while you sit back with a cup of chai and relax. Go back in the last ten mins in the kitchen to make a quick garlic and lemon sauce to toss the roasted potatoes in. Serve immediately so the crunch is maintained.
To make this, I have used rosemary, thyme and cilantro as the choice of herbs. However, swap any as per the choice and availability. However, use of garlic, lemon and chillies is non-negotiable 😀.
If you like this garlic lemon & herbs roasted potatoes recipe, do let me know in the comments below. You can also connect with me on my Instagram and Facebook handles.
You may also like –
Oven roasted garlic vegetables
Harissa roasted veggies with tahini dressing
Roasted potatoes cauliflower & kale
Garlic Lemon & Herbs Roasted Potatoes
Arpita Darooka
Healthy snack or as a side, this herby, garlicky and lemony deliciousness is sure to impress.
Prep Time 10 minutes mins
Cook Time 10 minutes mins
Bake Time 45 minutes mins
Course Side Dish, Snack
Cuisine Global, Greek, Indian
- 200 Gms Baby potatoes
- 1 Tbsp Olive oil
- 1/2 Tsp Rosemary fresh or dried (I used dried)
- 1/4 Tsp Salt
Sauce Ingredients
- 1.5 Tbsp Garlic Minced
- 1.5 Tbsp Cilantro Chopped finely
- 2 Tsp Butter
- 2 Tsp Green chillies Minced
- 1 Tsp Lemon juice
- Salt and freshly ground black pepper
- 1 Tsp Thyme Fresh or dried (I used fresh)
- 2 Tbsp Water
Garnish
- Chopped Cilantro
- Sesame seeds
Wash and clean the baby potatoes thoroughly. Yeah, we would roast them skin on.
Slice the potatoes in half and keep aside.
Preheat the oven at 175 C fan assisted. While the oven pre-heats, toss the potatoes in 1/2 tbsp olive oil, salt and rosemary.
Line a baking tray with baking paper, and brush the remaining 1/2 tbsp oil on it in a thin film.
Place the potatoes in a single layer with the skin side facing upwards.Roast them in the preheated oven at 175 C for approx 40-45 mins. In the last 10 mins, in a pan, heat butter on the stove top. Add garlic and green chillies and sauté until the garlic is fragrant and begins to change colour, takes approx 4-5 mins.
Add the chopped cilantro and thyme and cook it for 2 mins on low flame. Add salt and black pepper (remember salt is there in potatoes too, so add accordingly). Add water, mix everything well and cook for another minute. It would come together as semi dry sauce like consistency. Don’t add too much water as the potatoes will get soggy when tossed in it.
Switch off the flame and add lemon juice.
Take the potatoes out of oven and immediately toss in the sauce. Garnish and serve immediately.Enjoy!!!
* Increase or reduce the quantity of green chillies as per the heat tolerance.
* Use avocado oil to make sauce instead of butter for vegan option. Keyword garlic lemon & herb roasted potatoes, oven roasted vegetables, garlic vegetables, oven roasted veggies, roasted potatoes
Jul 13, 2021 | Mains
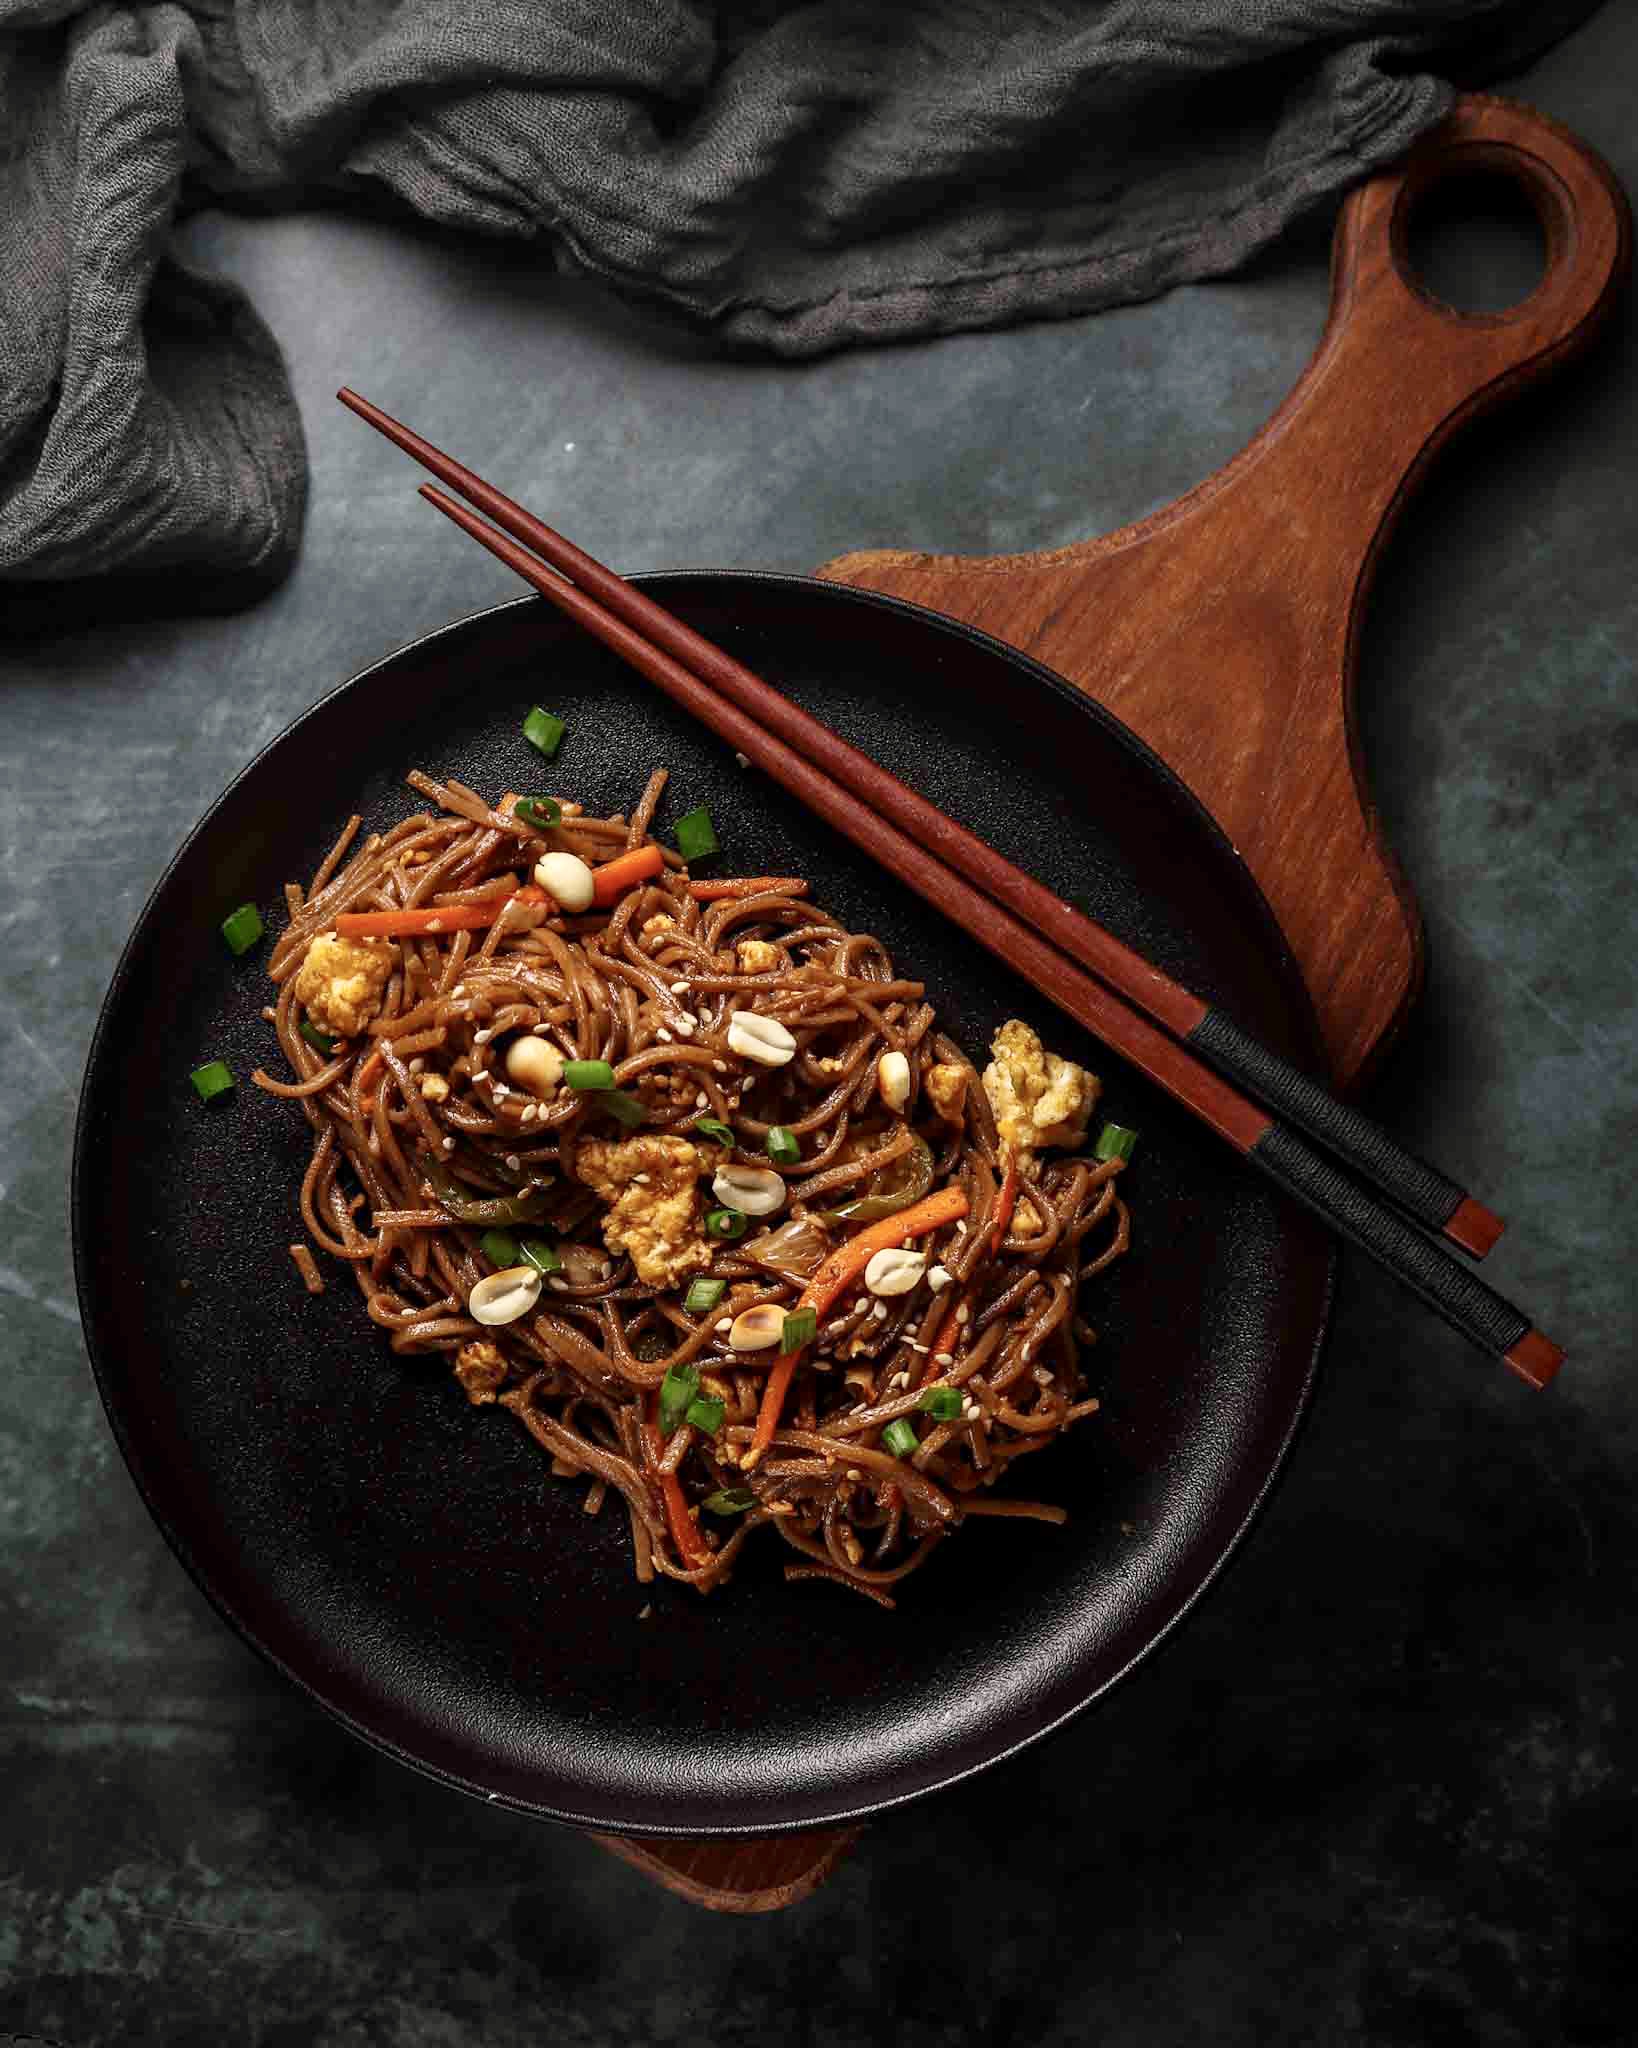
Spicy Egg Buckwheat Noodles
Indo-Chinese stir fry noodles which is made with sauces and veggies or tofu or eggs or meat. I like to keep my recipes simple and healthy. Usually and traditionally such kind of noodles are made with udon noodles or high gluten noodles. But as I mentioned, I love adding my healthy twist to my recipes, this is made with gluten free buckwheat noodles. Oh, this is so good, I promise you would love making the switch to healthier version of noodles. You may also skip the eggs for a vegetarian/vegan option.
This recipe is also super quick to make. All that I do is julienne cut my veggies (I use spring onions, bell peppers, carrots and cabbage when the season permits) and sauté them on high flame with garlic and ginger. Add soy sauce, red chilli paste, green chilli sauce, tomato ketchup, and vinegar along with some black pepper. Mix in the boiled buckwheat noodles and scrambled eggs and top it up with roasted peanuts and sesame seeds. This is the ultimate happy food for me and my husband.
If you like this recipe of Spicy Egg Buckwheat Noodles, please let me know in the comments below or connect with me on my Instagram and Facebook handles.
You may also like –
Vegan Balsamic & Basil Mushroom with Soba Noodles
Noodles in Ginger Broth
Spicy Egg Buckwheat Noodles
Arpita Darooka
Healthy, gluten-free, spicy noodles
Prep Time 10 minutes mins
Cook Time 15 minutes mins
Course Main Course
Cuisine Chinese, Global, Indo-Chinese
- 2 Portions Buckwheat noodles
- 2 Tbsp Sesame oil
- 1/4 Cup White part of spring green onions Chopped
- 1 Pc Carrot - small size Julienned
- 1 Pc Capsicum- small size Sliced
- 1 Tbsp Garlic Minced
- 1/2 Tbsp Ginger Minced
- Salt to taste optional
Egg Scramble
- 4 Pcs Eggs
- 2 Tsp Oil
- 1 Tsp Red chilli flakes optional
- 1/4 Tsp Salt
Sauce mix
- 2 Tsp Tomato ketchup
- 2 Tsp Soy sauce
- 1.5 Tsp Red chilli paste/sauce
- 1 Tsp Green chilli sauce
- 1.5 Tsp Chilli vinegar
- 1.5 Tsp Maple syrup
- Black pepper to taste
Garnish
- Spring greens
- Sesame seeds - toasted
- Peanuts - roasted
Boil buckwheat noodles as per packet instructions.
Mix all the sauce ingredients together.
To make the egg scramble, crack eggs in a bowl. Add red chilli flakes and just a pinch of salt. Whisk it well. Heat oil in a pan and pour the egg in it. Using a spatula, swirl it in the pan until the eggs begin to scramble and split. Cook on medium low heat as per the desired consistency of it. I like it a bit over cooked and cook it until the brown spots appear.
Heat oil in a wok and add the ginger and garlic. Sauté on medium high flame until fragrant and just begins to change colour. Add spring onion whites and sauté for a another few seconds. Add the remaining veggies and sauté until the veggies are cooked yet maintained their crunch.
Add in the sauce mix and coat the veggies well. Throw in the cooked noodles and mix everything gently. Taste and adjust seasonings. Switch off the flame. Add scrambled eggs and mix again gently.
Garnish with spring greens, toasted sesame seeds and roasted peanuts.Enjoy!!!
Keyword Hot and spicy chilli garlic noodles, Noodles recipe, spicy egg buckwheat noodles, Spicy noodles
Jul 12, 2021 | Mains
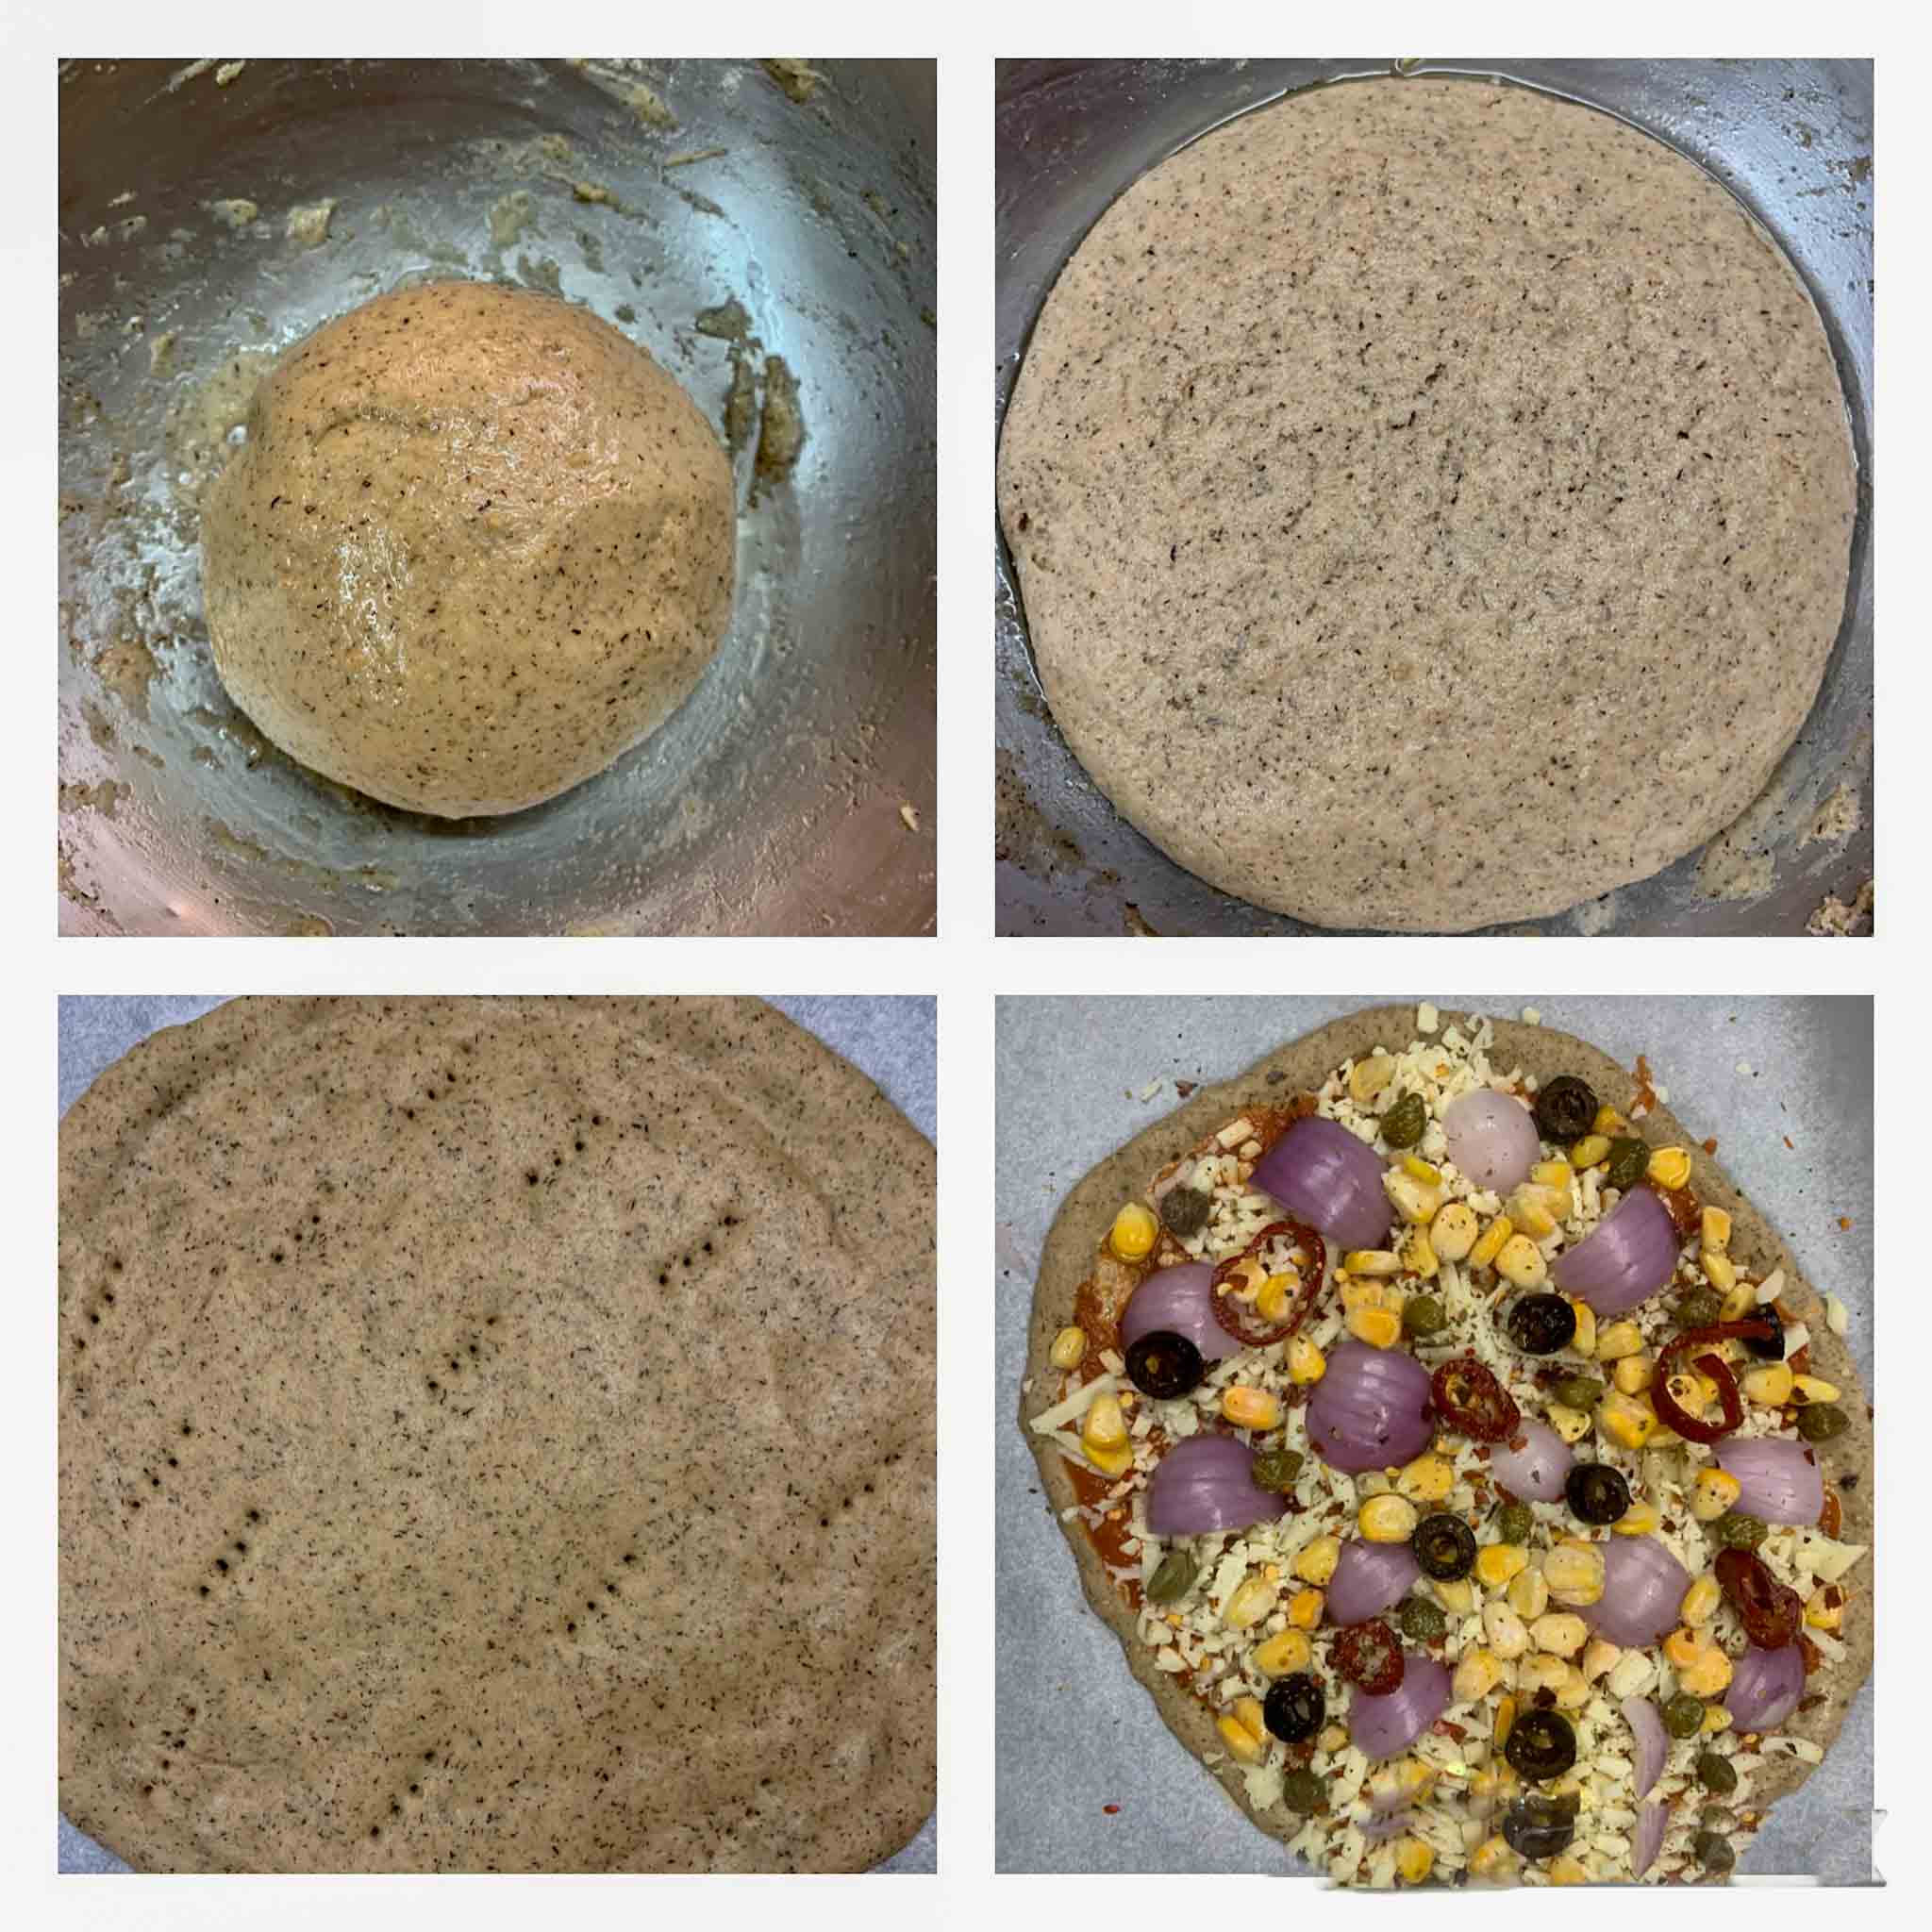
Whole Wheat & Buckwheat Pizza
When the pizza cravings kick in but you consuming refined flour isn’t an option. So tried my hands on healthy buck wheat and whole wheat bread base and I was super elated with the result. This is a healthy alternative to the regular pizzas, easy to make, with the desired toppings and preferably non-processed cheese. What I have used here is home-made tomato pizza sauce for this but feel free to use pesto instead of tomato pizza sauce.
I wanted the pizza base to rise and hence, the proportion/ratio of whole wheat flour and buckwheat flour is 3:1. I mean just look the happy picture below where the base has risen to almost triple the size. The picture is at the end of the post. The key is kneading and stretching the flour for sufficient amount of time. This wouldn’t give you the air pockets as the refined flour does. But knowing that it is healthy, we were ok to compromise on that aspect. However, taste wasn’t compromised at all and we totally loved and devoured our guilt-free weekend indulgence with a glass of aged wine for me and IPA for the husband.
If you like this recipe or have questions, please let me know your thoughts in the comments below or connect with me on my Instagram and Facebook handles.
You may also like –
Cheese Chilli Garlic Pull Apart Bread
Whole Wheat & Buckwheat Pizza
Arpita Darooka
Healthy guilt-free pizza with base made with healthy flour option.
Prep Time 20 minutes mins
Cook Time 15 minutes mins
Proofing Time 1 hour hr 30 minutes mins
Course Main Course
Cuisine Global, Italian
- 3/4 Cup Whole Wheat
- 1/4 Cup Buckwheat
- 1.5 Tsp Active yeast
- 1/4 Cup Water - lukewarm
- 1.5 Tsp Sugar
- 2 Tbsp Olive oil
- 1/4 Tsp Salt
- 1/2 Cup Water to knead the dough
Pizza Toppings
- Pizza sauce
- Mozzarella and aged cheddar cheese can use processed cheese too
- Cubed onions, jalapeños, capers, capsicum, sweet corn, red paprika, thyme/basil, oregano, sun dried tomatoes. or anything else of choice.
Activate the yeast by mixing it with lukewarm water and sugar. Let it rest for 10 mins until it becomes frothy.
Seive and mix the two flours together in a wide bowl and make a well in between. Add the activated yeast, olive oil, salt. Add more water to knead but in intervals and as required. Bring it all together with the help of a spatula.
Take it on a lightly floured surface and start to knead until it begins to come together. Stretch and knead until it is a smooth dough. Takes about 10-12 minutes
Tuck the dough in the greased bowl, cover and let it rest to proof in a dark warm place. I usually put it in my oven (switched off mode) for at least 1.5 hours.
Once the dough has risen, take it on a flat surface and use hands to stretch in gently into a flatbread. Using rolling pin would kill the air bubbles. Poke the base gently a few times with a fork.
Add the pizza sauce, cheese, and desired toppings. Let it sit covered again for 15 mins or until the oven is pre heated.
Bake it for 15-20 mins at 180 C Fan assisted or until the cheese looks done and the base is crisp. Enjoy!
Keyword healthy pizza, Pizza recipe, wholewheat & buckwheat pizza base
Jul 10, 2021 | Mains
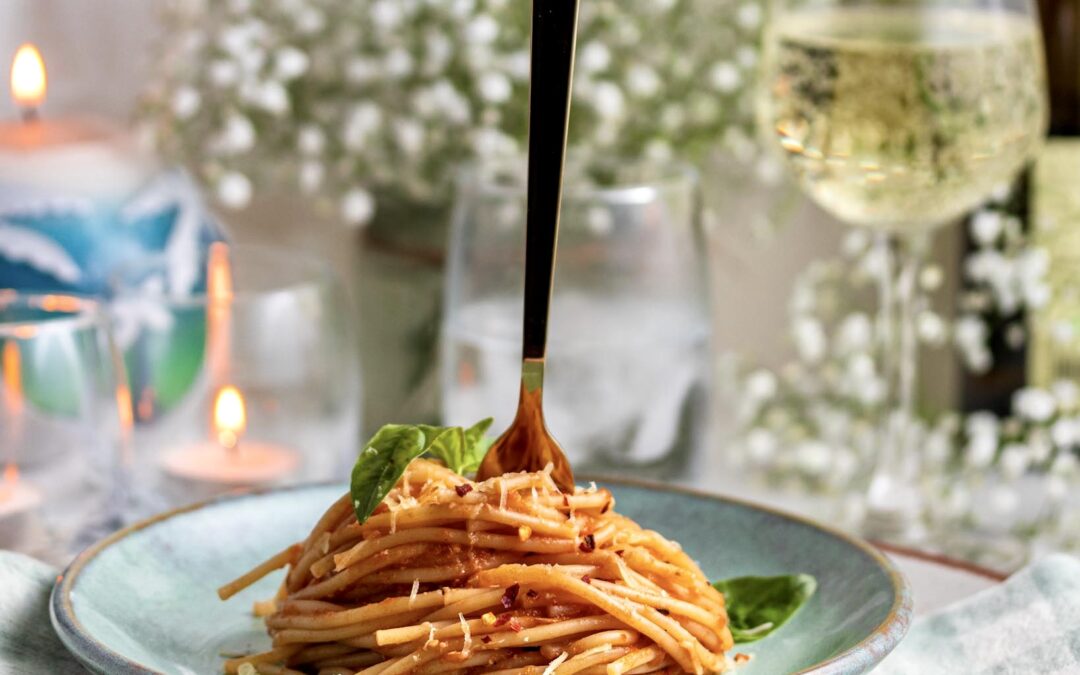
Red Sauce Pasta.
A gorgeous date night meal looks like this! A glass of wine, simple red sauce pasta and a long conversation goes a long way in reminiscing special moments of life. We usually do pastas and wine and just chatter non stop or do a movie marathon.
This is so simple to make and kid friendly flavours too. Spice levels could be adjusted as per the taste preference.
How to make it?
Make a cross slit in the bottom of 3 medium sized tomatoes and blanch them. Remove skin and purée them. Keep aside. Cook spaghetti for 2, in boiling water with a tsp of salt and 1 tsp oil, until al dente. Run it under cold water to arrest further cooking and keep aside. Heat 1 tbsp olive oil in a pan, add 2 tbsps chopped garlic, 1 cubed large onion and sauté them. Add the tomato purée and let it cook for few minutes. Add 3-4 basil leaves. Cook for 3-4 minutes. Switch off the flame, let it come to room temperature. Blend it again in a blender. Heat a tsp of olive oil again, add the blended mix, add 2 tbsp tomato ketchup. Mix in the cooked pasta, salt, pepper, chilli flakes, dried herbs of choice/pasta seasoning.
If you like this red sauce pasta recipe, do let me know in the comments below. You can also connect with me on my Instagram and Facebook handle.
You may also like –
Spinach And Mushroom Pasta
Roasted tomato and Chickpea Pasta
Red Sauce Pasta
Arpita Darooka
Simple, quick and easy date night pasta recipe
Prep Time 15 minutes mins
Cook Time 10 minutes mins
Course Main Course
Cuisine Italian
- 2 Portions Spaghetti - whole wheat
- 3 Pcs Tomatoes - medium sized
- 1 Tsp Salt
- 1 Tsp Oil
- Water to cook spaghetti in as required
- 1+ 1 Tbsp+ tsp Olive oil
- 2 Tbsps Garlic - minced
- 1 Pc Onion - large sized cubed
- 3-4 Pcs Basil leaves
- 2 Tbsp Tomato ketchup
- Salt and black pepper to taste
- Chilli flakes
- Dried herbs of choice/pasta seasoning
Make a cross slit in the bottom of 3 medium sized tomatoes and blanch them. Remove skin and purée them. Keep aside.
Cook spaghetti for 2, in boiling water with a tsp of salt and 1 tsp oil, until al dente. Run it under cold water to arrest further cooking and keep aside.
Heat 1 tbsp olive oil in a pan, add 2 tbsps chopped garlic, 1 cubed large onion and sauté them. Add the tomato purée and let it cook for few minutes. Add 3-4 basil leaves. Cook for 3-4 minutes. Switch off the flame, let it come to room temperature.
Blend it again in a blender. Heat a tsp of olive oil again, add the blended mix, add 2 tbsp tomato ketchup.
Mix in the cooked pasta, salt, pepper, chilli flakes, dried herbs of choice/pasta seasoning. Enjoy!!!
Keyword date night recipes, red sauce pasta